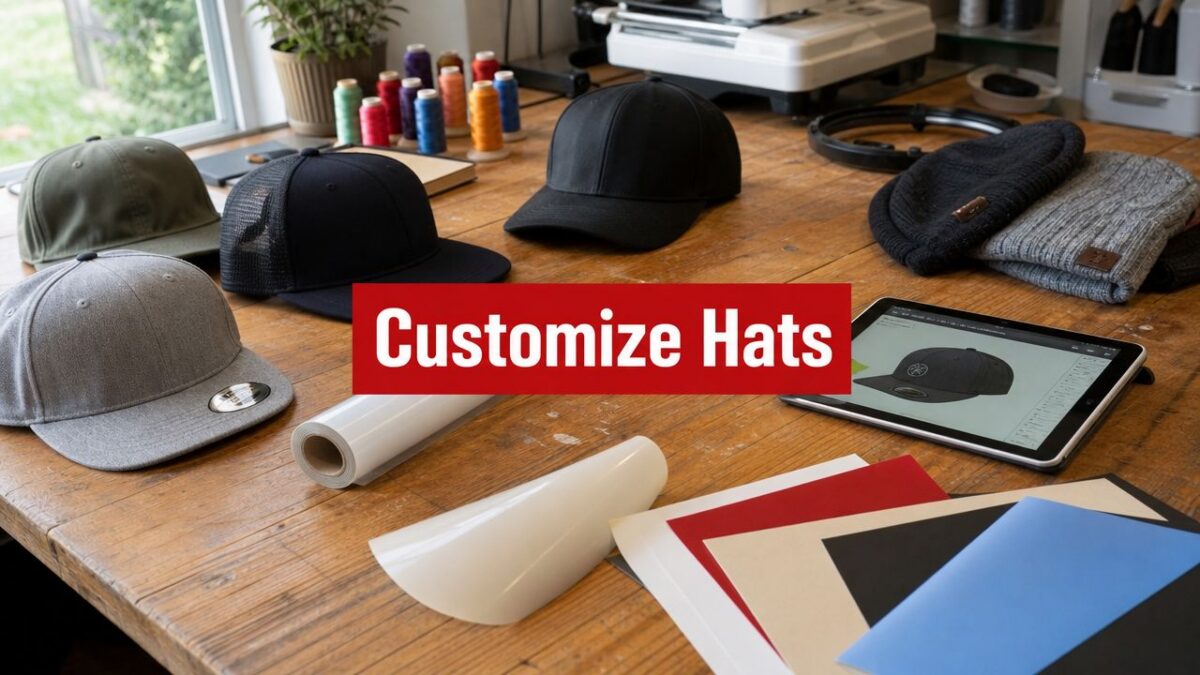
You've probably got the same thought most first-time buyers have. “I know I want hats. I know I want my logo on them. I have no idea what happens next.”
That's normal.
Custom hats feel simple from the outside, but the finished result depends on a few decisions that happen early. Pick the wrong hat for the wrong logo, and even a good design can look cramped or cheap. Pick the right combination of style, structure, and decoration, and the process gets much easier.
The good news is that learning how to customize hats isn't complicated once you look at it the way a shop does. Start with who's going to wear the hat. Then choose the hat itself. Then match the decoration method to that hat and to your order size. After that, proof it carefully and let production do its job.
The Big Idea Behind Your Custom Hat
Most first orders start the same way. Someone has a logo, a deadline, and a rough idea of who should wear the hat. The question is whether the order should be a small test run or a larger batch from the start.
I see this with small businesses all the time. A coffee shop wants a hat that works for staff now and retail later. A coach wants to check the look and fit before ordering for the whole team. A startup assumes six hats is too small to be worth doing, even though a short run can answer the questions that matter most: Does the logo read clearly? Does the hat style fit the audience? Is this something people will put on more than once?
That is the big idea. Custom hats turn out well when the order matches the goal.
Start with the job the hat needs to do
A hat for resale is judged differently from a hat for uniforms. A team cap needs consistency across the group. A staff cap needs comfort, easy reordering, and a style that works on different head shapes. An event giveaway usually has tighter budget limits and less room for premium decoration.
That first decision saves money.
A six-piece test run makes sense when you are still proving the concept, comparing two hat styles, or checking whether your logo looks better embroidered or printed. A larger bulk order makes sense when the hat style is already settled, the logo has been tested, and price per piece matters more than experimentation. Small businesses often skip that step and go straight to quantity. That is where avoidable mistakes show up.
Three choices shape the whole order
Clients often ask how to customize hats without getting buried in jargon. The process usually comes down to three connected decisions:
- The hat style
- The decoration method
- The order size
These are the three core decisions that shape the final product.
A clean logo on the wrong cap still feels wrong. The blank matters as much as the artwork.
The trade-offs matter because each choice affects the others. A low-profile unstructured hat can look great for retail, but it may not support a tall, detailed front logo as well as a structured cap. Embroidery holds up well and gives a polished finish, but it also has setup limits that matter more on a 6-piece run than on a 144-piece order. A larger order usually lowers the cost per hat, but only after you are confident the style and decoration are right.
Good ordering decisions follow that sequence. Choose the hat that fits the wearer and the use case. Then choose the decoration method that fits that hat. Then decide whether this should be a short test run or a full production order. That approach keeps the process simple and prevents the two mistakes I see most often: buying too many hats before testing, or testing on a hat that was never right for the job in the first place.
Choosing the Perfect Hat Style and Structure
The blank hat is your foundation. If this choice is off, everything after it gets harder.
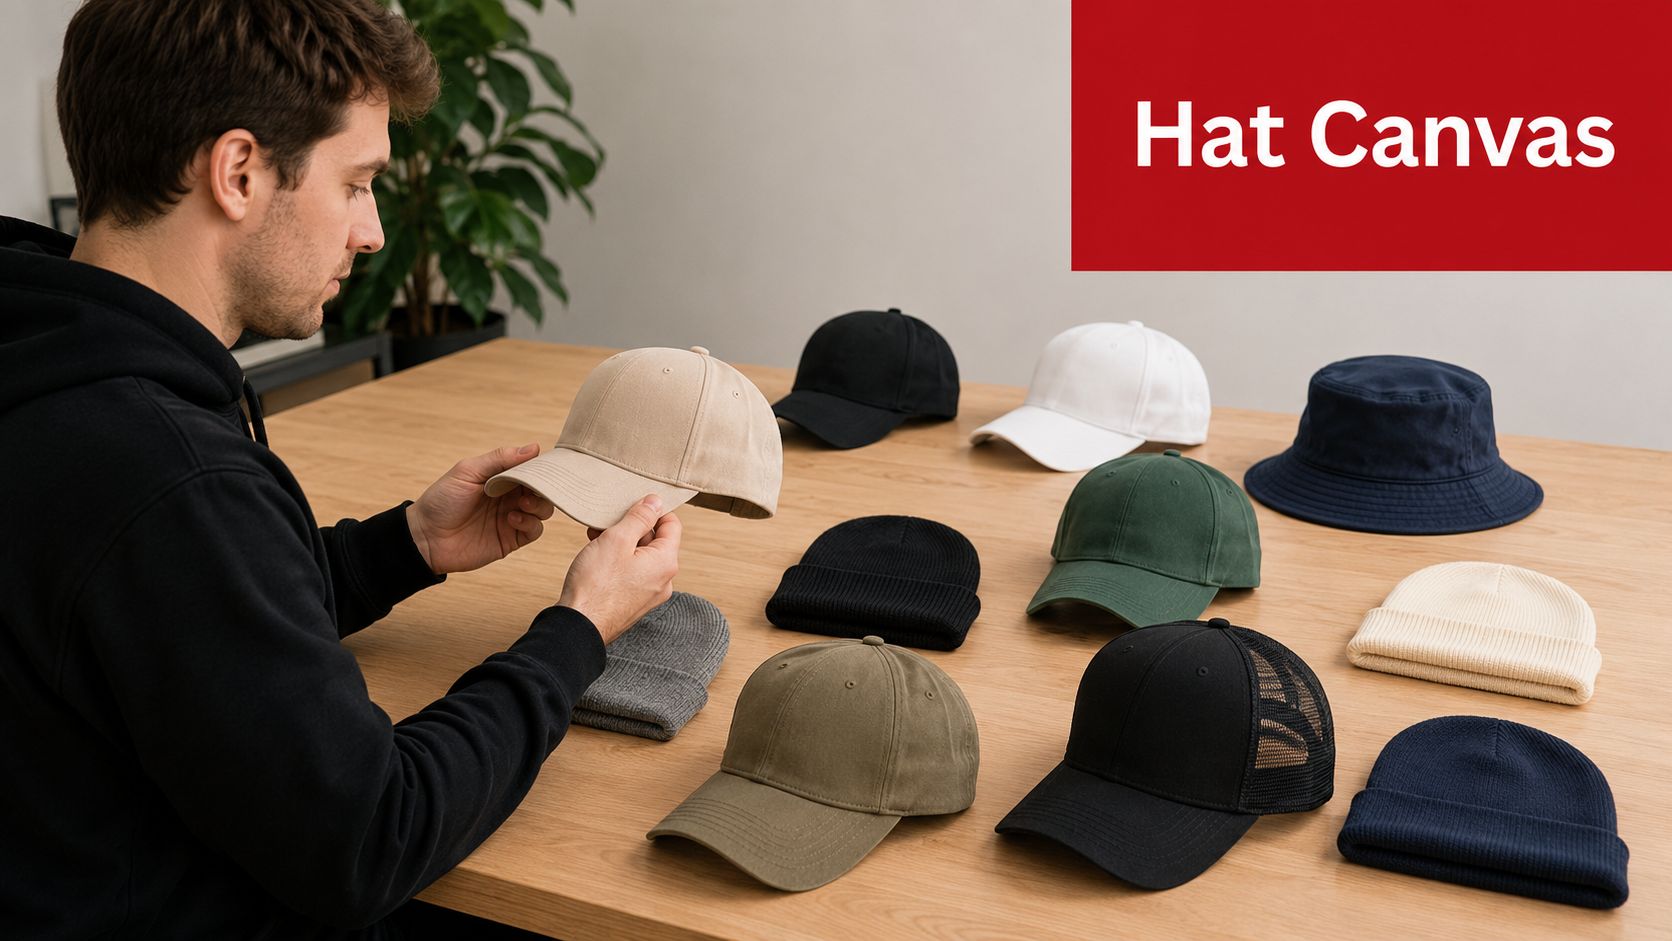
Choose for the wearer first
Don't start with your logo. Start with the person putting the hat on.
A team buying caps for dugout use, a landscaping company outfitting crews, and a lifestyle brand selling merch all need different things. The best-looking cap on a product page can still be the wrong choice if it doesn't fit the context.
A quick way to narrow it down:
- For staff and uniforms: Structured baseball caps and trucker styles usually hold shape well and look more consistent across a group.
- For casual merch: Dad hats and relaxed unstructured styles tend to feel easier, softer, and less “uniform.”
- For outdoor use: Trucker caps and performance-oriented styles can be more comfortable for long wear.
- For cold-weather programs: Beanies work well when the audience will use them, not just collect them.
Structure changes the final result
The phrase clients skip past most often is structured vs. unstructured. It sounds minor. It isn't.
A structured hat has a firmer front panel. That firmness helps many logos stand up visually, especially bolder embroidered designs. An unstructured hat has a softer, more relaxed crown. It can look great, but it doesn't present artwork the same way.
If you want a deeper breakdown, this guide on structured vs. unstructured hats is useful before you commit to a style.
Practical rule: If you want a crisp, upright front logo, a structured cap usually gives you a safer starting point.
The hat style affects decoration more than people realize
Beginners frequently get tripped up. They pick a hat because they like the silhouette, then assume any decoration method will work the same on it.
It won't.
Industry guidance highlighted in this cap embroidery article notes that stretchy caps may need double backing for embroidery to prevent puckering, while structured, curved caps require special digitizing and stitch sequencing. That's why choosing the hat style first helps determine the decoration method, not the other way around.
A simple decision tree that works
If you're stuck, use this shop-floor logic:
If you want polished and consistent
Go with a structured snapback, structured baseball cap, or a clean trucker front. These are easier to decorate clearly when the logo needs presence.
If you want casual and low-pressure
Choose a dad hat or other unstructured style. These fit brands that want an easy, broken-in look more than a rigid uniform feel.
If you want broad group fit
Use adjustable closures whenever possible. For mixed groups, that usually reduces headaches compared with fitted sizing.
If you want niche style appeal
Rope hats, beanies, and specialty silhouettes can work very well, but only when they match the audience. They shouldn't be picked just because they're trending.
Think about order size while you choose the blank
A six-piece test run and a bulk program are not the same project.
For a small trial order, pick the safest blank you can. Choose a hat you already know your audience likes, in a color that flatters the logo, with a shape that gives the decoration room to read clearly. For a larger order, you can take more calculated risks because you've already validated the fit and look.
That's one of the biggest practical lessons in how to customize hats. Don't use your smallest order to test five variables at once.
Bringing Your Design to Life with Decoration Methods
A client orders six hats for a staff test run, sends a logo pulled from their website, and asks for “whatever looks most premium.” That request sounds simple until the logo has thin lines, the hat has a curved front, and the budget leaves no room for a failed first pass. The decoration method decides whether the result looks clean or compromised.
The right method depends on three things working together. The artwork has to suit the process, the hat has to suit the decoration, and the order size has to justify the setup. Small business orders often get into trouble because buyers pick based on a mockup instead of production reality.
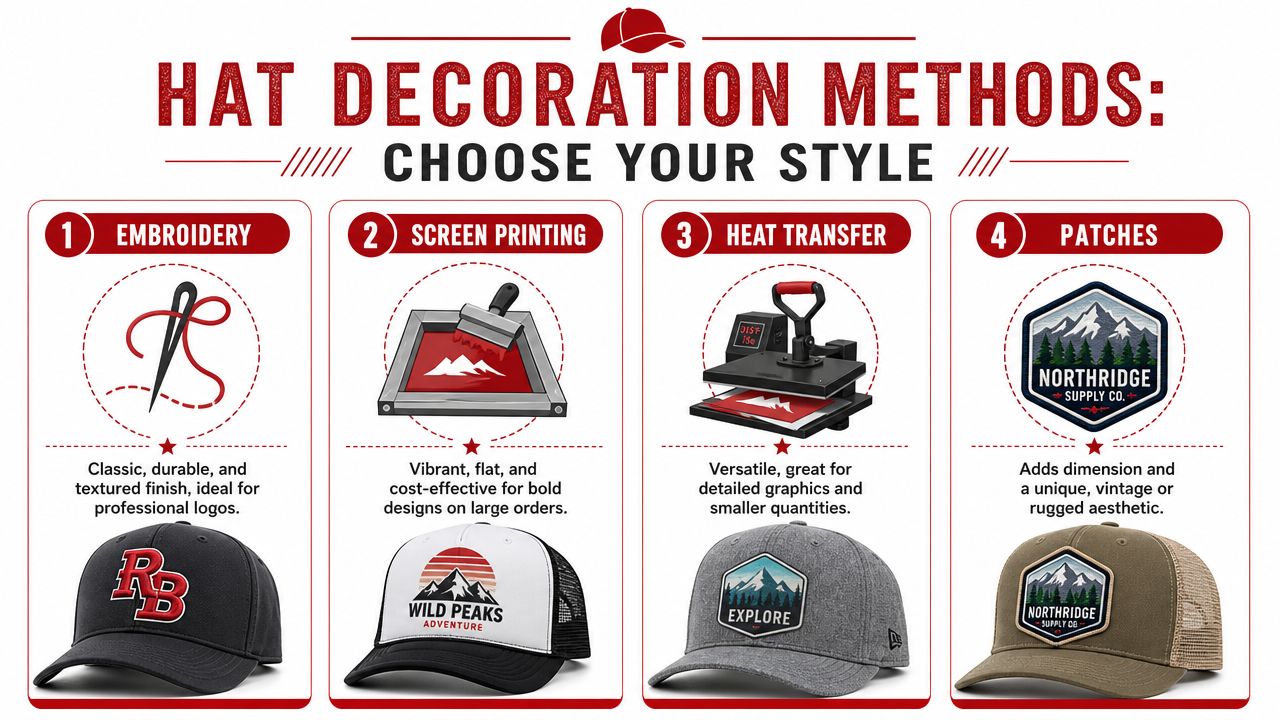
Embroidery is still the standard for a reason
For most custom caps, embroidery is the first method to evaluate. It wears well, adds texture, and gives a cap the finished look many teams want for uniforms, merch, and company gifts.
It works best with bold, simplified artwork. Strong shapes, initials, clean wordmarks, and icons usually stitch well. Tiny text, thin outlines, and gradient-heavy artwork usually need to be simplified or moved to another method.
Raised embroidery can add depth, but it also increases the need for clean shapes and enough open space in the design. Puff effects look strong on block letters and simple marks. They tend to fall apart on detailed logos.
Patches can solve problems direct stitching creates
Patches are often the better answer when the logo needs a border, a distinct shape, or a material contrast that direct embroidery cannot deliver cleanly.
They also change the feel of the hat. Leather patches read differently from woven patches. PVC feels more modern and branded. Embroidered patches keep some of the classic stitched look while giving the logo a clearer edge against busy fabric or mesh.
I recommend patches often for small test runs when the front panel fabric fights the artwork. A framed patch can rescue a logo that would look muddy stitched straight onto the cap.
Transfers and printing have real uses
Embroidery gets the first look on many hat orders, but it is not the only professional option. Heat-applied graphics and screen printing can be the better fit if the design has detail that thread cannot reproduce well or if the visual style needs a flatter finish.
If you're comparing options, review the different hat screen printing methods before assuming thread is the only serious choice.
Here's the quick comparison I give first-time buyers.
Hat Decoration Method Comparison
| Method | Best For | Durability | Look & Feel |
|---|---|---|---|
| Embroidery | Bold logos, team marks, classic branding | Durable | Raised, textured, traditional |
| Patches | Premium merch, heritage looks, logos needing separation | Durable when applied well | Layered, dimensional, distinctive |
| Screen printing | Select hat styles with bold graphic art | Depends on hat and application | Flat, graphic, smooth |
| Heat transfer | Detailed graphics, short-run experiments, certain specialty looks | Depends on process control | Smooth, versatile, often sharper for detail |
Heat application depends on setup, not luck
Heat-applied decoration can look excellent on hats, but only if the shop controls the pressing process well. Curved panels, center seams, and crown height all affect placement and adhesion.
A cap has to be prepped correctly before the graphic goes on. The front needs to sit properly on the platen, wrinkles need to be reduced, and pressure needs to match the material. If any of that is off, edges can lift, placement can drift, and the final hat can look crooked even if the graphic itself was produced correctly.
On curved caps, weak pressure and poor prepress are two of the fastest ways to create edge lift and off-center placement.
That's why hat presses and curved platens matter. A cap is a shaped product, not a flat print surface.
A quick visual comparison helps if you're deciding by look first.
Order size should influence your method
A 6-piece test run should answer a narrow question. Does the logo read well on this hat, and does the group like the look in person? That usually points to lower-risk decoration choices such as standard embroidery or a straightforward patch.
A larger bulk order changes the math. Repeatability matters more. Unit cost matters more. Production consistency matters more. A method that looks good on one sample still has to hold up across dozens or hundreds of hats without uneven placement, thread breaks, or unexpected variation.
That same focus on repeatability shows up in ecommerce operations too. Teams using tools like AI for ecommerce customer service often learn that consistent systems scale better than one-off improvisation. Hat production works the same way.
One practical note. Dirt Cheap Headwear offers in-house options for embroidery, patches, and printing with low minimums, which helps if you want to test one design before expanding the order.
Prepping Your Artwork for Flawless Production
Most production problems don't start on the machine. They start in the art file.

A logo can look sharp on your website and still fail on a cap. Hats give you a smaller decorating area, a curved surface, and less tolerance for tiny detail. If the file isn't prepared properly, the shop has to either simplify it, rebuild it, or tell you it won't hold up.
Give the shop the cleanest file you have
For embroidery, clean source art matters more than people think.
Industry guidance from VistaPrint's custom hat artwork recommendations recommends submitting vector files such as AI, EPS, or SVG, or raster files at 300 DPI saved at the final print size. That same guidance also says to convert fonts to outlines, which prevents text substitution errors during production.
If you only have a low-resolution screenshot, send it anyway, but understand that someone may need to rebuild it before production can start.
What usually needs fixing
The most common problem files have one of these issues:
- Tiny text: It may be readable on a flyer but not on a cap.
- Gradients: Embroidery doesn't reproduce smooth tonal transitions well.
- Thin lines: They can break up or fill in.
- Too many small elements: A hat front isn't a poster.
- Live fonts: If the production system doesn't have that font, the design can change.
A good art file doesn't mean “highly detailed.” It usually means clean shapes, controlled color use, and spacing that survives stitching.
Clean logos almost always win on hats. Not because shops prefer simple art, but because hats punish clutter.
Match the file to the placement
Front-center logos get the most room and the most attention, but they also sit on the most visibly curved area. Side and back placements can be great for secondary branding, short text, or a small icon, but they need restraint.
If your design crosses seams, expect extra care during setup. If it relies on perfect tiny alignment, you may need to revise the concept instead of forcing the production team to chase an impossible result.
For buyers who want to understand the production side better, this explainer on how to digitize a logo for embroidery helps make sense of why one logo stitches beautifully and another needs cleanup.
Use this file-prep checklist
Before you send artwork, check these off:
- Use vector when possible: AI, EPS, and SVG are usually the cleanest option.
- Save raster art properly: If you must use raster, make it 300 DPI at final size.
- Outline the fonts: Don't leave text dependent on installed fonts.
- Simplify effects: Remove gradients, tiny outlines, and micro details.
- Export the final version: Don't send five near-identical files and hope the shop guesses.
That prep work saves time, reduces revisions, and gives you a much better shot at a proof that looks right the first time.
From Digital Proof to Your Doorstep
You approve the mockup at 4 p.m. because it looks close enough on screen. A week later, the hats arrive and the logo feels too high, the thread color disappears into the crown, and the side hit you added as a last-minute extra makes the whole cap feel busy. That is the kind of mistake a proof is supposed to catch.
The proof is the checkpoint where a smart hat order gets tighter, not just approved faster. On a screen, small issues look harmless. On an actual cap, a quarter inch in placement or a slightly wrong thread color can change the whole result.
That matters even more for small businesses and teams placing a first order. If you are testing six hats for staff, a pop-up, or a new brand launch, use the proof to answer whether this setup should exist at all. If you already know the design works and you are ordering in bulk, the proof is more about consistency and making sure the reorder matches what you approved the first time.
Review the proof like a buyer, not just a fan of the logo
A lot of first-time clients only ask one question: does it look good?
Ask better ones.
- Does the logo sit too high or too low on the crown?
- Does the decoration look balanced on this hat shape, not just centered in a file?
- Does the thread, patch border, or print color stand out enough against the hat color?
- Does any part of the design get crowded by a seam, eyelet, or closure?
- If someone sees this from a few steps away, will they read it clearly?
Those questions catch the problems that cause reorders, not just revisions.
Understand the setup charge before you compare order sizes
For embroidery, your artwork has to be converted into a stitch file before the machine can sew it. As noted in Merchology's hat customization process, that digitizing step is typically a one-time setup charge, and the file is then used to run the design in the programmed stitch sequence. New buyers often get stuck on that fee, but the key question is whether the design is settled enough to justify setup.
For a 6-piece test run, that fee carries more weight because it is spread across fewer hats. That can still be the right call if you are using the first order to test fit, placement, and overall look before committing to a larger run. For a bulk order, the same setup cost usually matters less per hat, so the bigger risk is approving a proof too casually and repeating the same mistake across dozens or hundreds of pieces.
Small test run or bulk order? Use the proof differently
A six-piece run should answer practical questions fast. Keep the variables under control. Pick one hat style, one main logo placement, and a colorway you expect to reorder. If you test too many versions at once, you learn less.
A larger order needs a different mindset. At that stage, the proof should confirm repeatability. Make sure the exact hat color, logo size, thread colors, patch treatment, and placements match what you intend to scale. Experienced buyers, therefore, slow down, because one loose approval on a bulk order is expensive.
The best first proof is not the fanciest version. It is the version that gives you a clear yes or no on whether this hat works.
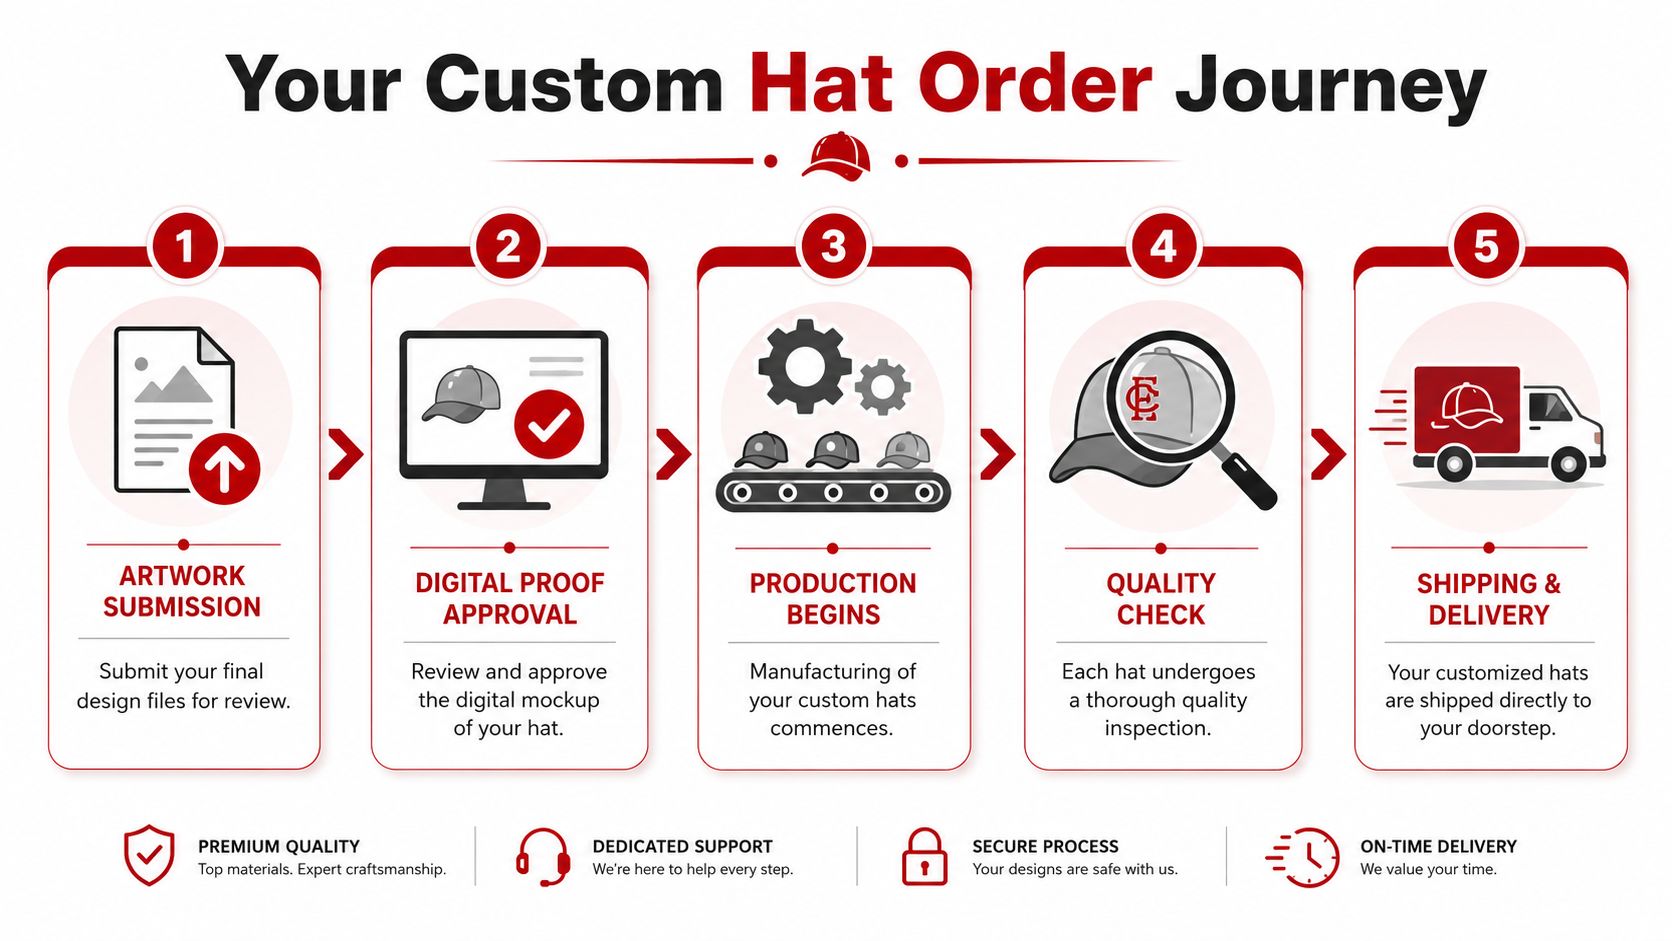
The production flow is usually simple
Most hat orders move through the same steps:
- Submit artwork and hat choice
- Review the digital proof
- Approve production
- Run production and quality check
- Ship the order
The sequence is straightforward. The judgment call happens at proof approval.
If the proof looks close but not right, revise it. If you are unsure whether the front logo is too large, ask for a size adjustment before production. If the side or back logo feels optional, cut it now instead of paying to learn that lesson after delivery. That habit saves more money than rushing an order ever will.
Caring for Your Custom Hats and Final Tips
Once the hats arrive, treat them like decorated products, not disposable blanks.
The safest habit is simple. Spot clean when possible, keep the crown supported so it holds shape, and avoid rough washing that bends the bill or stresses the decoration. Embroidered hats usually hold up very well, but they still last longer when you don't crush them into gym bags or run them through harsh cleaning cycles.
Patches and heat-applied graphics also benefit from gentler handling. If a hat gets sweaty or dusty, clean it carefully and let it dry in shape. Don't toss a fresh-cleaned hat into a pile and expect it to come out looking retail-ready.
Three final takeaways that prevent most mistakes
Pick the hat before the decoration
The blank controls more than people expect. Structure, fabric, and shape all affect what will look good and what will fight the design.
Simplify more than you think you need to
Hat space is limited. Strong logos almost always outperform busy ones on headwear.
Treat the first order like a learning tool
If you're a small business, team, or startup, a short run can help you validate fit, look, and audience response before you place a bigger reorder.
The easiest custom hat order is the one that solves one problem well. A staff hat. A launch hat. A team hat. Start there.
Good custom hats don't come from luck. They come from a few solid decisions made in the right order. Once you understand that, the process gets much less intimidating.
If you're ready to turn a logo into a wearable hat program, Dirt Cheap Headwear is one option for sourcing blanks and decorated headwear with low-minimum custom orders. Start with a small test run if you need to. That's often the smartest first step.
Pingback: The Complete Guide to Custom Award Trophies