You're probably looking at bucket hats for one of three reasons. Your brand wants a merch piece that feels more current than another basic cap, your event needs something wearable that people will keep, or you've got a logo and no idea why one shop says it'll sew cleanly and another says it needs changes.
That confusion is normal. Bucket hat embroidery sits right at the intersection of fashion, fabric behavior, and production reality. The blank you choose affects what artwork will work. The artwork affects where it can go. And both of those choices affect price, proofing, and whether the finished hat looks sharp or disappointing.
From the shop side, the cleanest orders usually come from clients who understand one simple truth. A bucket hat is not just a smaller billboard for your logo. It's a soft, curved product with seams, sweatbands, vent holes, and a sloped brim. When the hat and the design match each other, the result looks effortless. When they don't, even a good logo can fight the product the whole way through production.
Why Custom Bucket Hats Are a Smart Merch Move
Bucket hats aren't a novelty add-on anymore. They've moved from utility wear into fashion, streetwear, festival merch, and branded lifestyle gear, which makes them one of the more flexible headwear options a client can buy.
The business case is strong, too. The global bucket hats market is estimated at USD 420 million in 2026 and projected to reach USD 660 million by 2034, with a 5.93% CAGR, according to Fortune Business Insights' bucket hats market report. That same projection matters for decorators because the growth is tied to streetwear trends and social media influence, both of which push buyers toward visible, custom, logo-forward products instead of plain blanks.
Why brands keep coming back to this style
A bucket hat does something a lot of promo products don't. It can feel casual, fashion-aware, and useful at the same time.
That matters if you're ordering for:
- Staff uniforms: Outdoor teams, hospitality crews, and pop-up vendors get sun coverage without the harder look of a structured cap.
- Merch tables: Apparel brands and creators can sell embroidered bucket hats as part of a capsule instead of treating them like an afterthought.
- Events and festivals: People wear them during the event, which gives the item immediate value.
- Team and community orders: Schools, clubs, and nonprofits can put a mark on a hat that feels more lifestyle-driven than purely athletic.
Practical rule: If your audience already buys streetwear, summer gear, or event merch, bucket hats usually feel like a product choice, not a giveaway.
There's also a logistics angle that buyers miss. Hats live at eye level. If your brand mark needs visibility in photos, on social posts, or in crowded spaces, embroidered headwear does that job well when the placement and blank are chosen correctly.
For online sellers, this can fit neatly into a broader merchandising system. If you're building a storefront around branded products, customer service matters almost as much as product selection. A good example is this breakdown of how AI chatbots transform Shopify stores, especially if you're answering repeat questions about sizing, colors, proofs, and lead times while selling custom merch.
Why embroidery fits the category so well
Bucket hats work best when the decoration feels integrated with the hat, not printed on top of it as an afterthought. Embroidery gives that stitched-in, permanent feel buyers expect from headwear.
That's why these hats work for both ends of the market. One client wants subtle branding on washed cotton. Another wants a louder front logo for a streetwear drop. Same product family, very different use case.
The smart move isn't just deciding to order bucket hats. It's choosing a blank and a design style that behave well together so the hats look intentional when they arrive.
Selecting the Perfect Hat Blank
Most first-time buyers start with color. Shops start with construction.
That's not because looks don't matter. It's because the fabric, crown shape, and internal build of the hat decide how much control the embroidery machine has once the needle starts moving. If the blank fights the process, your logo will show it.
The bucket hat's origin helps explain why some styles decorate better than others. The style traces back to early 1900s Irish fishermen and farmers, and modern descriptions center on a narrow, downward-sloping brim with soft but durable materials like cotton canvas, denim, or tweed, as described in the bucket hat history and construction overview. That soft construction is part of why bucket hats can be embroidery-friendly. The crown is stable enough to stitch, but not so rigid that every design works anywhere.
Start with the fabric, not the logo
If you're choosing between blanks, think about how the material behaves under needle penetration and tension.
| Material | Best For | Embroidery Considerations |
|---|---|---|
| Cotton twill | Clean logo merch, staff hats, everyday branded wear | Usually a forgiving choice. It holds detail reasonably well and doesn't fight the machine the way slick fabrics can. |
| Cotton canvas | Streetwear, retail merch, bolder front logos | One of the better surfaces for bucket hat embroidery because it feels stable and substantial. Good for flat embroidery when the design is sized sensibly. |
| Denim | Heavier fashion-forward styles | Can look excellent with simple logos, but thickness and seams can affect placement near panel joins. |
| Tweed or heavier wool blends | Heritage styling, seasonal collections | Texture becomes part of the look. Fine detail can get visually lost in the surface. |
| Nylon | Lightweight outdoor hats | Useful when weight and function matter more than texture, but slick surfaces can show distortion more easily if the design is too dense. |
| Polyester packable styles | Travel, giveaways, packable outdoor merch | These are the most likely to force compromise. Great for portability, less forgiving for dense or highly detailed embroidery. |
What usually works well
The easiest first order is an unstructured cotton or canvas bucket hat with a simple front design. That combination gives the digitizer room to control stitch direction and density without fighting a slippery or overly thin fabric.
If you want a logo on the front crown, ask yourself three things:
- Is the fabric soft but still substantial?
- Is the front area clear of vent holes or awkward seam breaks?
- Will the hat still drape naturally after stitching?
If the answer to the third question is no, the design is too heavy for the hat.
Soft doesn't mean weak. On bucket hats, a softer crown often embroiders better than a rigid shape, as long as the fabric itself is stable.
What clients often choose for the wrong reasons
A lot of people pick a blank because it photographs well as a plain sample. Then they add a logo later and find out the hat was never a good match for embroidery.
Common examples:
- Ultra-light packable hats: They fold nicely, but decoration options get narrower fast.
- Very slick technical fabrics: They can look premium in hand, yet they're less forgiving when the design has fill areas or tiny text.
- Busy construction details: Extra seams, eyelets, contrast stitching, and unusual panel shapes can all steal usable embroidery space.
A better way to buy is to decide what matters most.
Match the hat to the job
If your order is for retail merch, choose the blank that makes the embroidery look intentional.
If it's for event use, choose the blank that balances wearability and a design simple enough to survive production cleanly.
If it's for outdoor staff or team use, prioritize a hat that can take repeated wear without the embroidered area becoming stiff or distorted.
That's the buyer side of the decision. The designer side starts right after this, because the right blank still won't rescue artwork that was never prepared for thread.
Prepping Your Artwork for Flawless Stitching
A bucket hat can only sew what the machine can read and what the fabric can support. That's why artwork prep matters so much. The best embroidery files aren't just good-looking logos. They're logos translated into shapes, stitch paths, and spacing that make sense on a curved textile surface.
![]()
Give the shop the right file first
If you send a low-resolution screenshot, fuzzy JPG, or artwork pulled from social media, the shop has to rebuild your design before it can even think about digitizing it.
What helps most:
- Vector files: AI, EPS, or a clean PDF are the standard starting point.
- Editable text when possible: If the font is still live, cleanup is easier.
- Color intent: Thread isn't ink. A shop needs to know which parts matter most visually.
- Placement preference: Front center, side panel, or all-around branding are different production jobs.
A lot of clients hear “digitizing” and think it means converting a file type. It doesn't. Digitizing is the process of assigning stitch types, directions, densities, underlay, and sequencing so the machine can sew the art in the right order. If you want a deeper look at what that involves, this guide on how to digitize a logo for embroidery is a useful reference.
Design for the real stitching area
On a screen, your logo sits on a flat artboard. On a bucket hat, it sits on a curved crown above a sloped brim, often near eyelets and sometimes without a center seam to reference.
That changes what “good placement” means.
The safest placements usually avoid:
- Vent holes
- Seam intersections
- Areas too close to the brim break
- Designs so wide they wrap into distortion
If you want a front logo, the cleanest art is usually compact and balanced. Not tiny. Not oversized. Just shaped to live in the usable crown area without running into the hat's geometry.
Small text is where many first-time orders go wrong. If someone has to lean in to read it on a proof, it probably needs simplification before stitching.
Simplify before the machine forces the issue
The artwork that embroiders best is rarely the artwork with the most detail. It's the artwork with the clearest hierarchy.
Good candidates for bucket hat embroidery usually have:
- bold shapes
- controlled line variation
- limited tiny negative spaces
- text that can stay legible in thread
Trouble starts when a design includes distressed textures, narrow outlines, layered gradients, or fine illustration detail that depends on print rather than stitch.
A simple logo often looks stronger on a hat than a complicated one. That's not a limitation. It's good product design.
Here's a useful visual explainer on preparing logo art before embroidery production:
Ask for adaptation, not blind reproduction
A professional shop shouldn't just say yes to every file exactly as submitted. It should tell you when the logo needs adjustment for the blank you picked.
That can mean:
- reducing small detail
- thickening thin lines
- separating tight shapes
- resizing the mark to suit the hat
That isn't the shop changing your brand. It's the shop protecting it.
When buyers and decorators get this part right together, proofs go faster, sew-outs improve, and the final hat feels like the design belonged there from the start.
From Flat Stitch to 3D Puff Embroidery
A lot of clients think embroidery is one option with one look. In practice, the finish changes a lot depending on the style of stitching, how the file is digitized, and how the hat is stabilized during production.
On bucket hats, the first big decision is whether your design wants flat embroidery or a raised look. Most of the time, flat embroidery is the cleaner answer because bucket hats are softer and more flexible than structured caps.
Why flat embroidery is usually the safer choice
Flat embroidery lays the design directly into the fabric without trying to build height. It works best for logos with detail, smaller lettering, outlined shapes, and art that needs cleaner edge definition.
On bucket hats, that matters because the surface is already doing enough. You've got a soft crown, a curve near the brim, and often less rigid support than a traditional snapback or fitted cap. Adding too much stitch mass can make the hat pucker or feel heavy in one spot.
Good flat embroidery choices include:
- left chest style logos adapted for headwear
- script marks with enough thickness
- small to medium icons
- clean wordmarks
Where 3D puff fits, and where it doesn't
3D puff embroidery can look great on the right product. It gives letters and shapes a raised profile by building thread over foam. But on bucket hats, it's a more limited tool.
It tends to work best when the design is:
- bold
- simple
- large enough to support the raised effect
- not dependent on fine interior detail
If the logo has tiny counters, delicate strokes, or multiple small elements, puff usually makes it harder to read. Soft bucket hat construction can also make the raised embroidery feel less controlled than it would on a structured cap.
If your brand aesthetic leans chunky and graphic, it's worth discussing. A shop that offers both standard stitching and raised options, such as the examples shown in these custom puff embroidery hats that sell, can help you compare whether the look suits the hat you chose.
Raised embroidery is an effect, not an upgrade. The right question isn't whether puff looks cooler. It's whether your logo and hat construction can support it cleanly.
The part clients don't see in production
A lot of embroidery quality comes down to setup. One professional workflow is to hoop a firm stabilizer first, mark the hat's center, and fold the sweatband out of the stitch path before sewing, as shown in SanMar U's guide to embroidering hats and caps. That process matters because bucket hats often don't give you a reliable seam line to align from, so the shop has to build alignment from the hat's shape.
That setup solves real production problems:
- Centering: Without a clear reference line, placement can drift.
- Needle clearance: Sweatbands can get caught if they aren't secured away from the field.
- Puckering control: Stabilizer supports the fabric while the stitches lock in.
- Cleaner registration: The design lands where the proof says it should.
More stitches isn't automatically better
This is one of the biggest misunderstandings in custom embroidery. Clients sometimes assume a denser design means a richer result. On a bucket hat, that can backfire.
Too much stitch density can:
- stiffen the front panel
- pull the fabric out of shape
- reduce drape
- make curved areas look uneven
The goal isn't maximum thread. It's controlled thread.
That's why a good shop may simplify fill areas, change stitch direction, or recommend a different treatment entirely. Clean embroidery looks effortless because someone made a lot of careful technical choices before the machine ever started running.
Placing Your Order with Confidence
Most first-time bucket hat orders feel more complicated than they really are. The process only gets messy when key decisions are still floating around after the quote stage.
The smooth orders usually follow a simple pattern. The client already knows the blank, the placement, and the art direction. The shop checks whether those three choices make sense together, sends a proof, and production moves once approval is locked in.
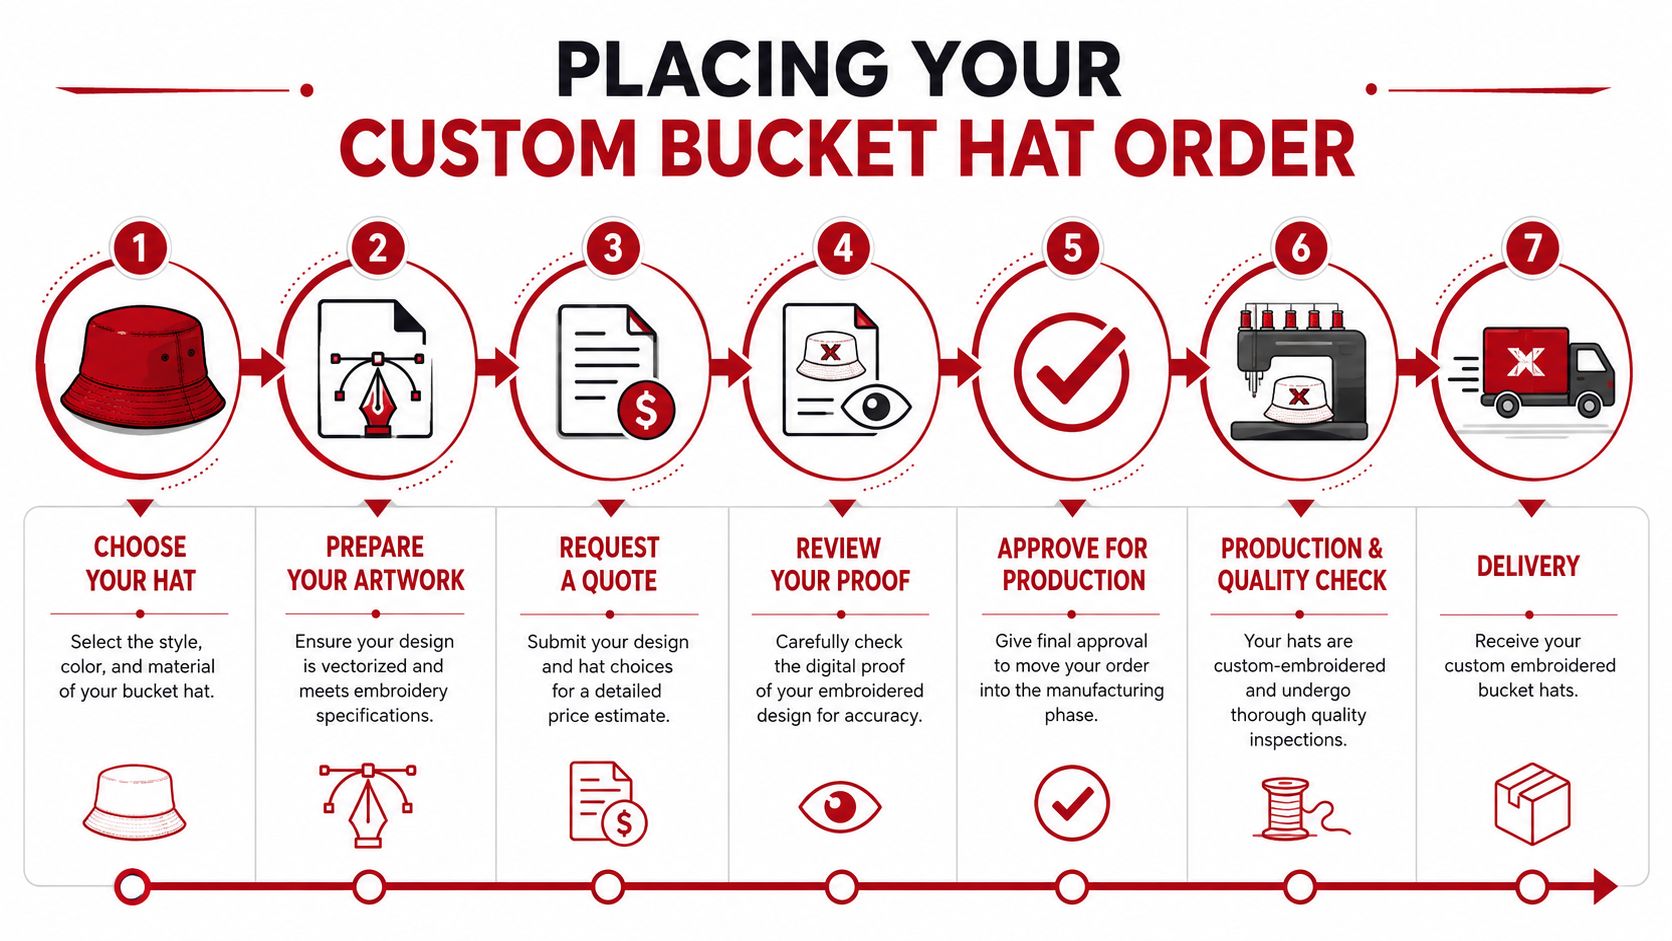
What a clean order looks like
A typical order starts with the client submitting:
- the hat style or a shortlist of blanks
- the logo file
- the embroidery location
- the quantity split by color
- the deadline, if there is one
Then the shop evaluates whether the blank and artwork are compatible. If they are, you get pricing and a mockup or digital proof before production starts. If they aren't, a good shop flags problems early instead of sewing a bad result and hoping you accept it.
For clients ordering through a wholesale headwear supplier with decoration services, the process is often straightforward. For example, Dirt Cheap Headwear's bucket hat bulk order tips outline the kind of planning details buyers should have ready before requesting a quote.
The proof stage is where mistakes get caught
Many buyers glance at the proof, check the logo, and approve it too fast. That's where avoidable errors slip through.
Review the proof for:
- Placement: Is it too high, too low, or too close to the brim break?
- Scale: Does the logo look balanced for the crown area?
- Thread color interpretation: Some brand colors translate differently in thread than on screen.
- Orientation: Is the art straight relative to the hat geometry?
- Content: Spelling, punctuation, version control, and trademark details
Approve the proof like you're the last person who can still prevent a production error, because that's usually true.
Ask practical questions before approval
You don't need to sound like a decorator. You just need to ask the right things.
A useful client checklist at this point:
- Can this logo sew cleanly on this exact blank?
- Will any part of the design sit near eyelets, seams, or the sweatband zone?
- Is the design being simplified or adjusted for embroidery?
- Is this a flat stitch job, or is a raised effect being considered?
- What happens if the chosen hat goes out of stock before production?
That last question matters more than people think. Headwear inventory shifts, especially on popular colors or seasonal blanks.
Think like a reorder customer
The best first order is one you can repeat. If your team might reorder later, save the approved artwork version, thread notes, hat style, and placement specs.
That way, your second order isn't a fresh experiment. It's a controlled repeat of something that already worked.
Avoiding Mistakes and Caring for Your Hats
The fastest way to waste money on bucket hat embroidery is to assume every bucket hat can take every design. It can't.
Structural feasibility is the issue that gets overlooked most often. Bucket hats often lack the rigid buckram and stable centerline of traditional caps, which means material choice, stitch density, and design sizing matter a lot more on the softer curved surface, as discussed in this video on bucket hat embroidery limits and setup. That's why a logo that looks perfect on a structured cap can look strained on a lightweight bucket hat.
The mistakes that cost buyers the most
Some problems start before production. Others show up the first time the hats are worn.
The most common ones are:
- Mismatched blank and design: A dense logo on a light, packable hat is asking the fabric to do too much.
- Artwork that relies on tiny detail: Thread has limits. Fine print detail often disappears or closes up.
- Proofs approved too quickly: The sew-out usually reflects the proof, not the original idea in your head.
- Ignoring crown shape: A bucket hat's surface isn't flat, so width and placement need restraint.
- Treating all hats the same: Cotton canvas, nylon, and polyester don't react the same way under tension.
A pre-order check that prevents most headaches
Before you submit the order, run through this short filter.
- Blank check: Is the hat fabric stable enough for your design style?
- Design check: Have small details, thin lines, or tiny text been simplified?
- Placement check: Is the design clear of seams, vent holes, and the brim transition?
- Production check: Has the shop confirmed the art is suitable for that exact blank?
- Proof check: Did you review size, alignment, color interpretation, and spelling?
- Reorder check: If this item sells or gets used again, can you repeat it consistently?
If any one of those answers is shaky, pause the order. Fixing the file or switching blanks before production is much easier than trying to explain away a weak finished product.
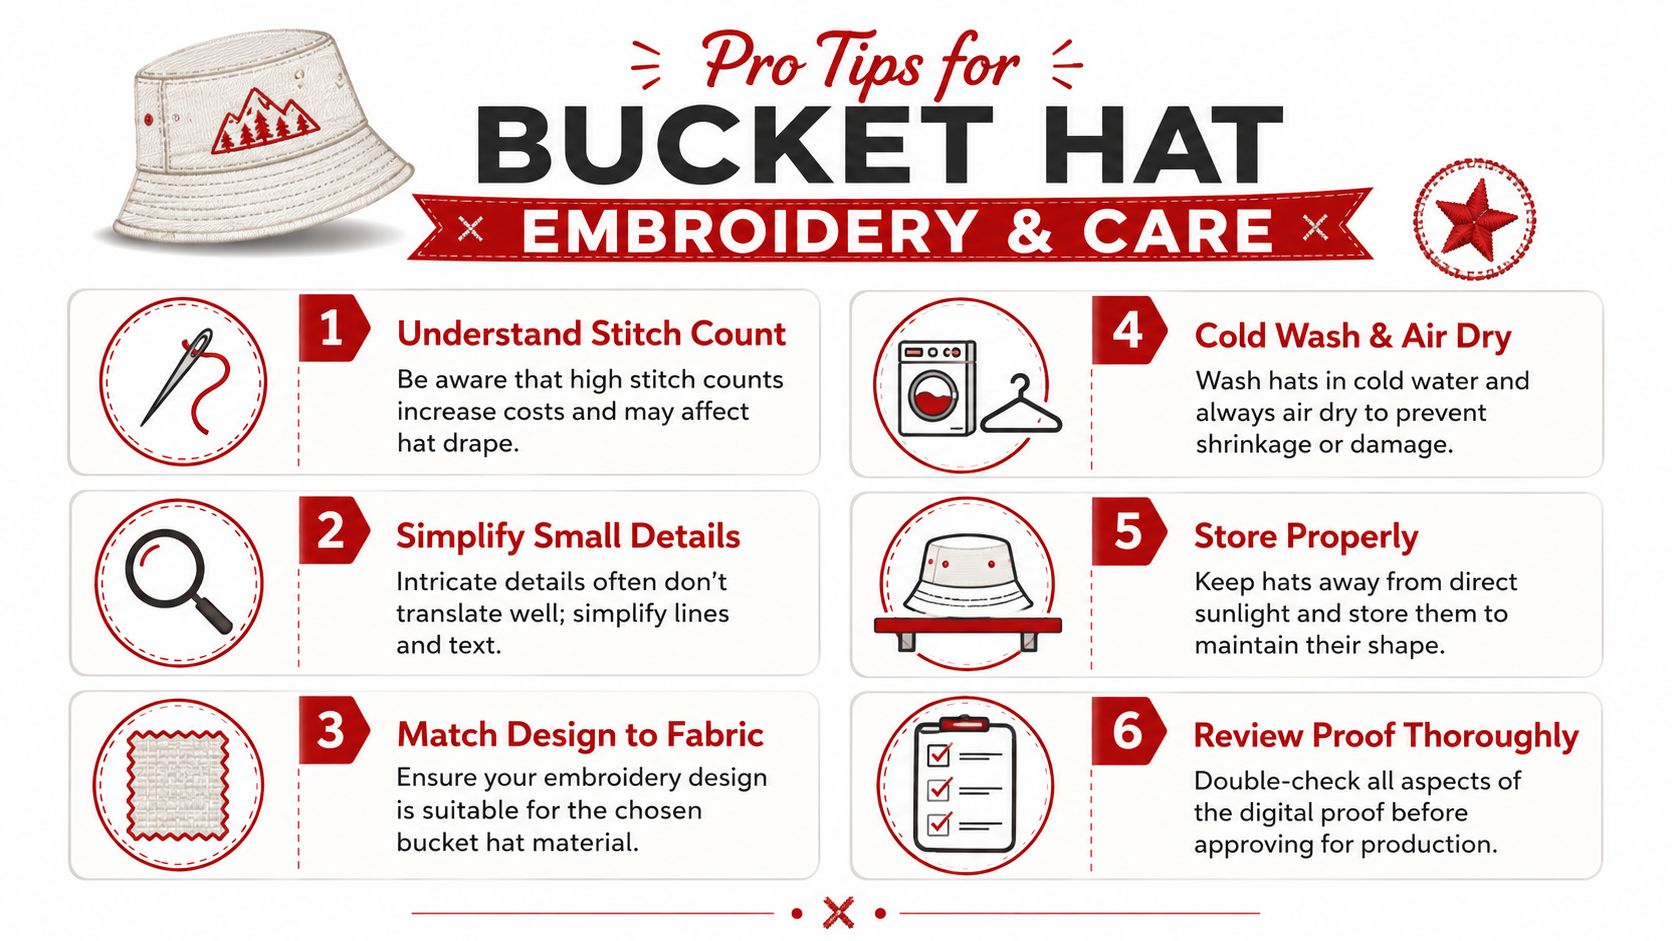
How to keep the embroidery looking good
Care is simple, but people ruin embroidered hats by treating them like gym laundry.
A few habits help:
- Wash cold: Gentle washing is easier on both the fabric and stitched area.
- Air dry: Heat can affect shape and finish.
- Store with shape in mind: Don't crush the crown under heavier items.
- Keep them out of prolonged direct sunlight when stored: It helps preserve the look of the hat over time.
- Handle stains early: Spot cleaning is usually safer than aggressive scrubbing over embroidery.
Bucket hats are casual, but the embroidery isn't casual labor. If you want them to keep their shape and hold a clean stitched appearance, treat them like decorated apparel, not disposable promo gear.
If you're ready to turn a logo into a wearable bucket hat that sews cleanly, Dirt Cheap Headwear offers blank headwear sourcing and custom embroidery with low minimums, including bucket hat options. A good first step is sending over your artwork and preferred hat style so the shop can tell you whether the design and blank are a solid match before production starts.
Pingback: Corduroy Bucket Hat: A Complete Brand & Style Guide 2026 | Dirt Cheap Headwear