
Tiger Iron on Patch: A Complete Application Guide for 2026
You've probably got the same setup I see all the time. A tiger patch in one hand, a blank hat in the other, and one big question: can this be ironed on cleanly, or am I about to ruin a good cap?
That question matters more with hats than it does with jackets or tote bags. A flat hoodie chest panel is forgiving. A curved crown, mesh back, moisture-repellent front panel, or soft beanie is not. A tiger iron on patch can look fantastic on headwear, but only if the patch, the fabric, and the application method all match.
Most generic patch guides skip that part. They tell you to heat it, press it, wait, and hope for the best. In a headwear shop, that's where the headaches start. The wrong heat on the wrong cap leads to lifting corners, warped panels, shiny fabric marks, or a patch that holds for one event and then starts peeling.
What Is a Tiger Iron-On Patch Anyway
A tiger iron on patch is an embroidered patch with a heat-activated backing. You place it on fabric, apply heat and pressure, and the adhesive on the back bonds to the material. Simple in theory. Less simple once the “fabric” is a structured trucker cap or a polyester snapback.
For many, the project starts small. You've got a plain dad hat, a team cap, or a sample piece for a brand drop, and you want something with more personality than standard front embroidery. Tiger graphics work because they carry attitude immediately. They read as bold, vintage, athletic, military-inspired, or streetwear depending on the artwork.
Why tiger patches never really go out of style
Tiger imagery has real history behind it. One of the best-known examples is the Flying Tigers insignia, which was officially created in early 1942 by Walt Disney Studios for the American Volunteer Group, featuring a Bengal tiger with wings soaring out of a “V,” as documented in this AVG Flying Tigers patch discussion.
That kind of heritage matters because people don't just buy a patch for function. They buy the look, the story, and the signal it sends.
A tiger patch never feels neutral. It always says something.
What size are you usually working with
A common embroidered tiger patch size is about 2.75 x 3.34 inches, which gives you a useful reference point for placement on hats and apparel, based on this vintage tiger patch listing. On hats, that's large enough to be visible, but it can still be too tall or too stiff for certain crown shapes.
That's where people get tripped up. A patch that looks perfect on a jacket sleeve can feel oversized on a low-profile unstructured cap. On headwear, you're not only choosing the design. You're choosing how much curve the patch can tolerate without puckering or lifting.
The Anatomy of an Iron-On Patch
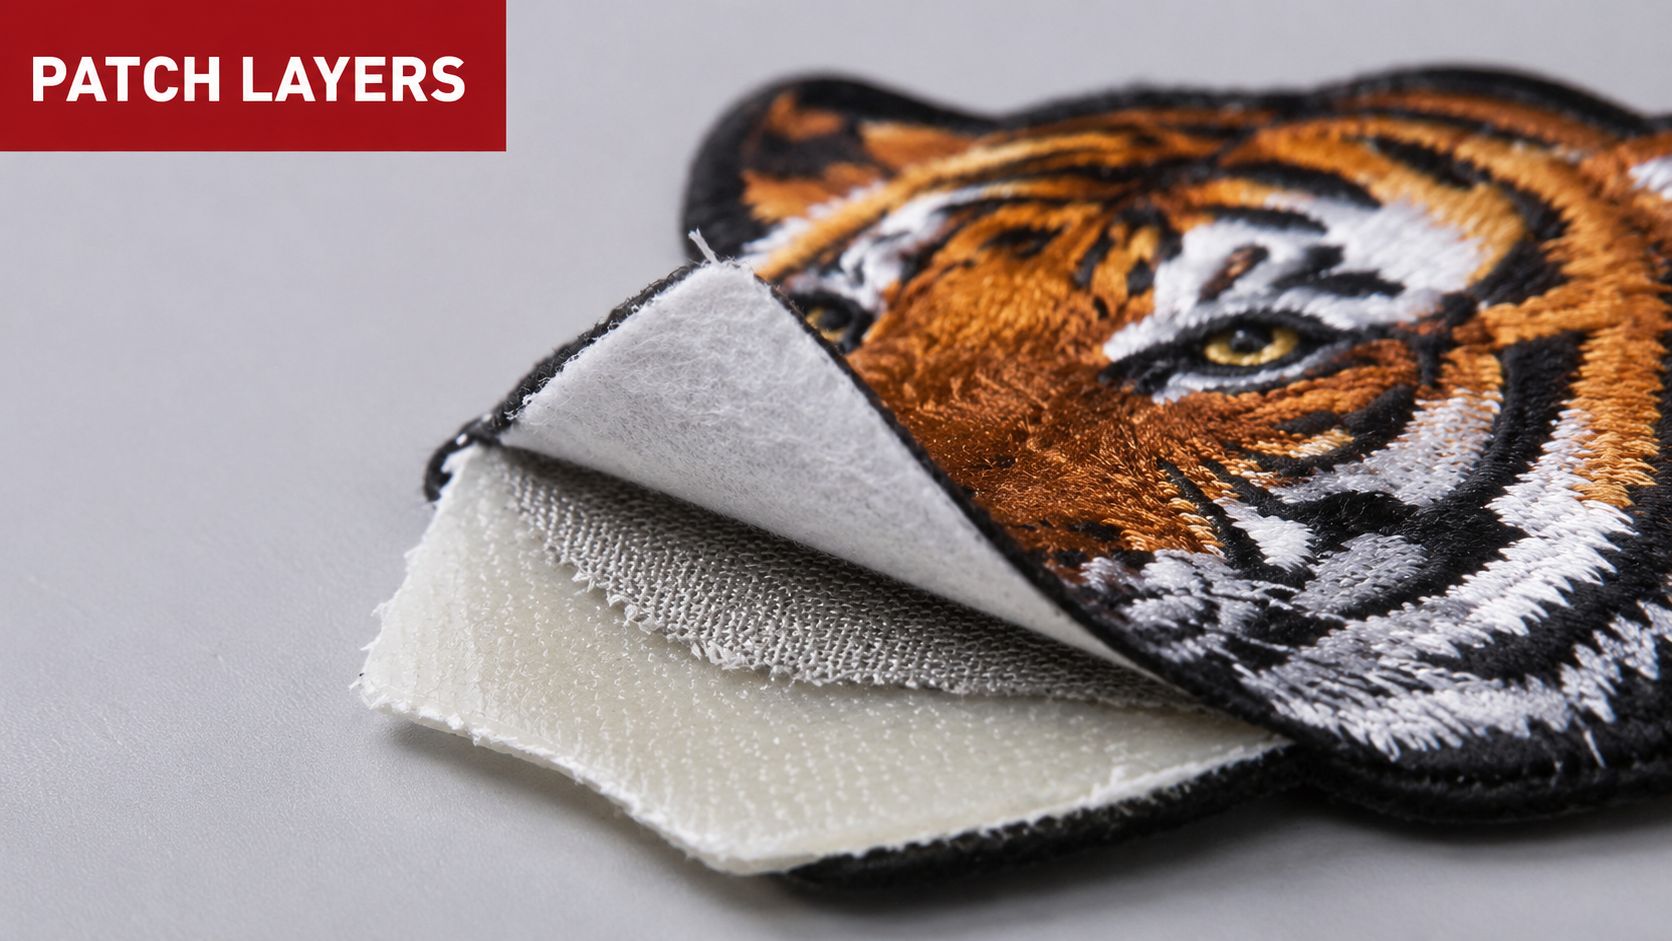
A good tiger iron on patch is basically a layered build, resembling a sandwich. The embroidery is the face, the base material gives it structure, and the adhesive backing is what turns it from a decorative patch into something you can apply with heat.
The top layer matters more than people think
The embroidered face is what you see, and patch quality shows up fast at close range. Quality embroidered tiger patches use 6 to 8 thread colors, a stitch density of 12 to 15 stitches per cm², laser-cut borders within ±0.5 mm, and a backing under 2.5 mm thick to help avoid bulk on garments, according to this embroidered tiger patch product spec.
Those details aren't just factory trivia. They affect whether the stripes look crisp, whether the edges stay clean, and whether the patch sits nicely on a hat instead of looking chunky.
Why border quality changes the finished look
On hats, edge definition is huge. If the border is rough, fuzzy, or uneven, the whole piece looks cheap once it's centered on the front panel. Clean laser-cut borders help the patch sit flatter and reduce the chance of visible fraying at the edge.
That's one reason some shops steer customers toward woven patches when the artwork is detail-heavy or the surface area is tight. If you want to compare patch styles on hats, this guide to woven patch hats is a useful reference.
The backing is where the real work happens
The heat-activated backing is the functional layer. It's what melts just enough to grab the fabric and lock the patch in place. If the backing is too thick, the patch can feel stiff on softer hats. If it's poor quality, it may tack down at first and then release along the corners.
Here's the practical way to read a patch before you apply it:
- Dense embroidery usually means a more substantial patch face.
- Thin, clean edges usually mean easier placement and a more polished finish.
- Moderate overall thickness usually works better on hats than overly rigid builds.
Shop-floor rule: A patch can be beautifully made and still be wrong for a specific hat shape.
That's why patch construction and headwear style have to be treated as a pair, not as separate choices.
Applying Your Tiger Patch Like a Pro
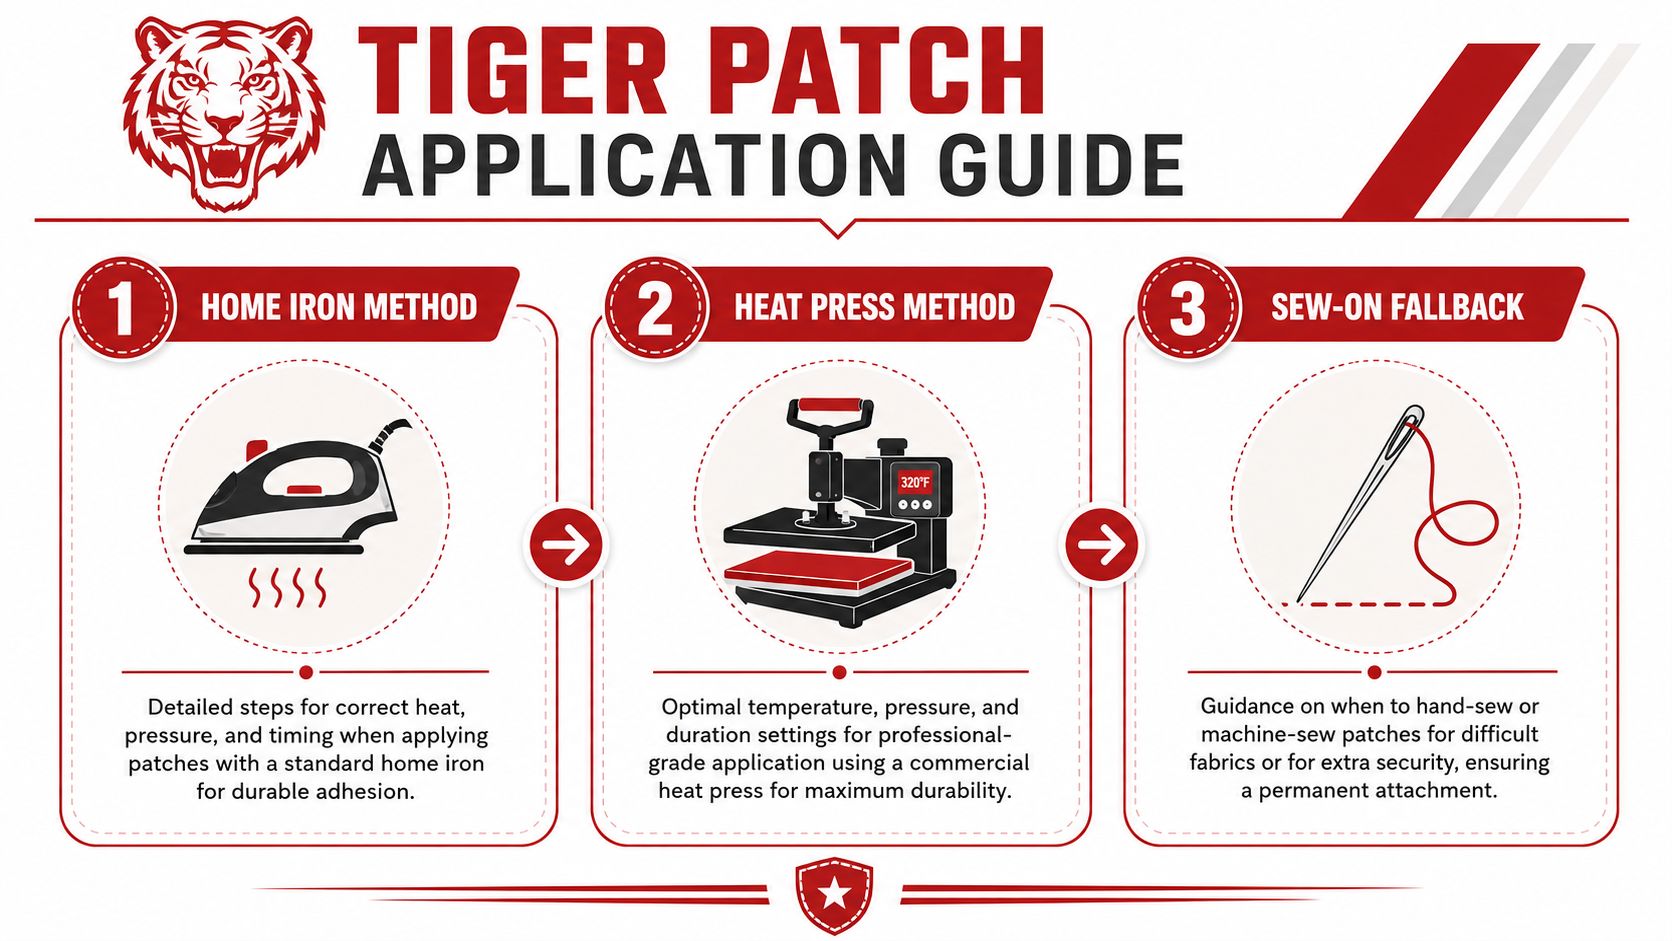
If you want the short version, here it is: heat, time, and pressure have to work together. Miss any one of them and the bond gets unreliable. The backing on tiger iron-on patches requires 270°F to 290°F for 15 to 20 seconds under firm pressure, and going outside that window can lead to weak adhesion or damage, according to this tiger patch application spec.
A lot of failed patch jobs happen because people think “hot enough” is good enough. On hats, it isn't.
Home iron versus heat press versus sewing
Here's the honest comparison.
| Method | Best use | What works well | Main drawback |
|---|---|---|---|
| Home iron | One-off DIY jobs on simple hats | Easy access, no special machine needed | Uneven pressure on curved surfaces |
| Heat press | Shop work, repeatable runs, cleaner finish | Better consistency and more control | Needs proper setup and technique |
| Sewing | Performance fabrics, high-wear hats, long-term durability | Most secure option for tricky materials | More labor and visible stitching |
The home iron method
A home iron can work, but hats make it awkward. You're trying to press a flat metal surface onto a curved crown. That means some parts of the patch get pressure, others barely do.
Use this method when the hat fabric can safely take heat and the patch isn't oversized.
- Pre-check the hat fabric. If it feels coated, slick, or heat-sensitive, stop and consider sewing instead.
- Position the patch carefully. On a front panel, small misalignment is obvious.
- Stabilize the hat. Support the inside so the crown doesn't collapse.
- Press firmly for the required time. Don't slide the iron around.
- Let it cool before testing. Tugging early can break the bond before it sets.
If you're trying decorative patch ideas beyond tiger graphics, this roundup of iron-on butterfly patches shows how style and application needs can vary by patch shape.
Here's a useful demo if you want to watch the process in action:
Why a heat press is usually better
A heat press gives you two things a home iron usually can't. Even heat and more consistent pressure.
That matters on hats because the patch adhesive doesn't care whether your application felt solid. It responds to actual contact across the full backing. If one edge got less pressure, that's the edge that starts lifting first.
For production work, samples, branded event hats, or anything customer-facing, a proper press setup is usually the safer route.
If you're making more than a couple hats, consistency matters more than convenience.
When sewing is the smarter choice
Some hats just shouldn't be treated like iron-on candidates. Structured truckers, coated synthetics, and many performance caps are better handled with stitched edges or full sew-on application.
Sewing also makes sense when:
- The hat will be washed often
- The cap fabric feels slick or treated
- The patch sits on a strongly curved panel
- The item is for resale or team use, where failure isn't acceptable
Iron-on backing can still help hold placement during sewing, which is useful. But on the wrong hat, don't force the iron-on method just because the patch came with adhesive.
Troubleshooting Common Patch Problems
Most patch failures aren't random. They come from a mismatch between the patch, the fabric, and the way pressure was applied. When someone says, “I followed the directions and it still failed,” the underlying issue is usually that the standard directions were written for flat garments, not hats.
Lifting edges
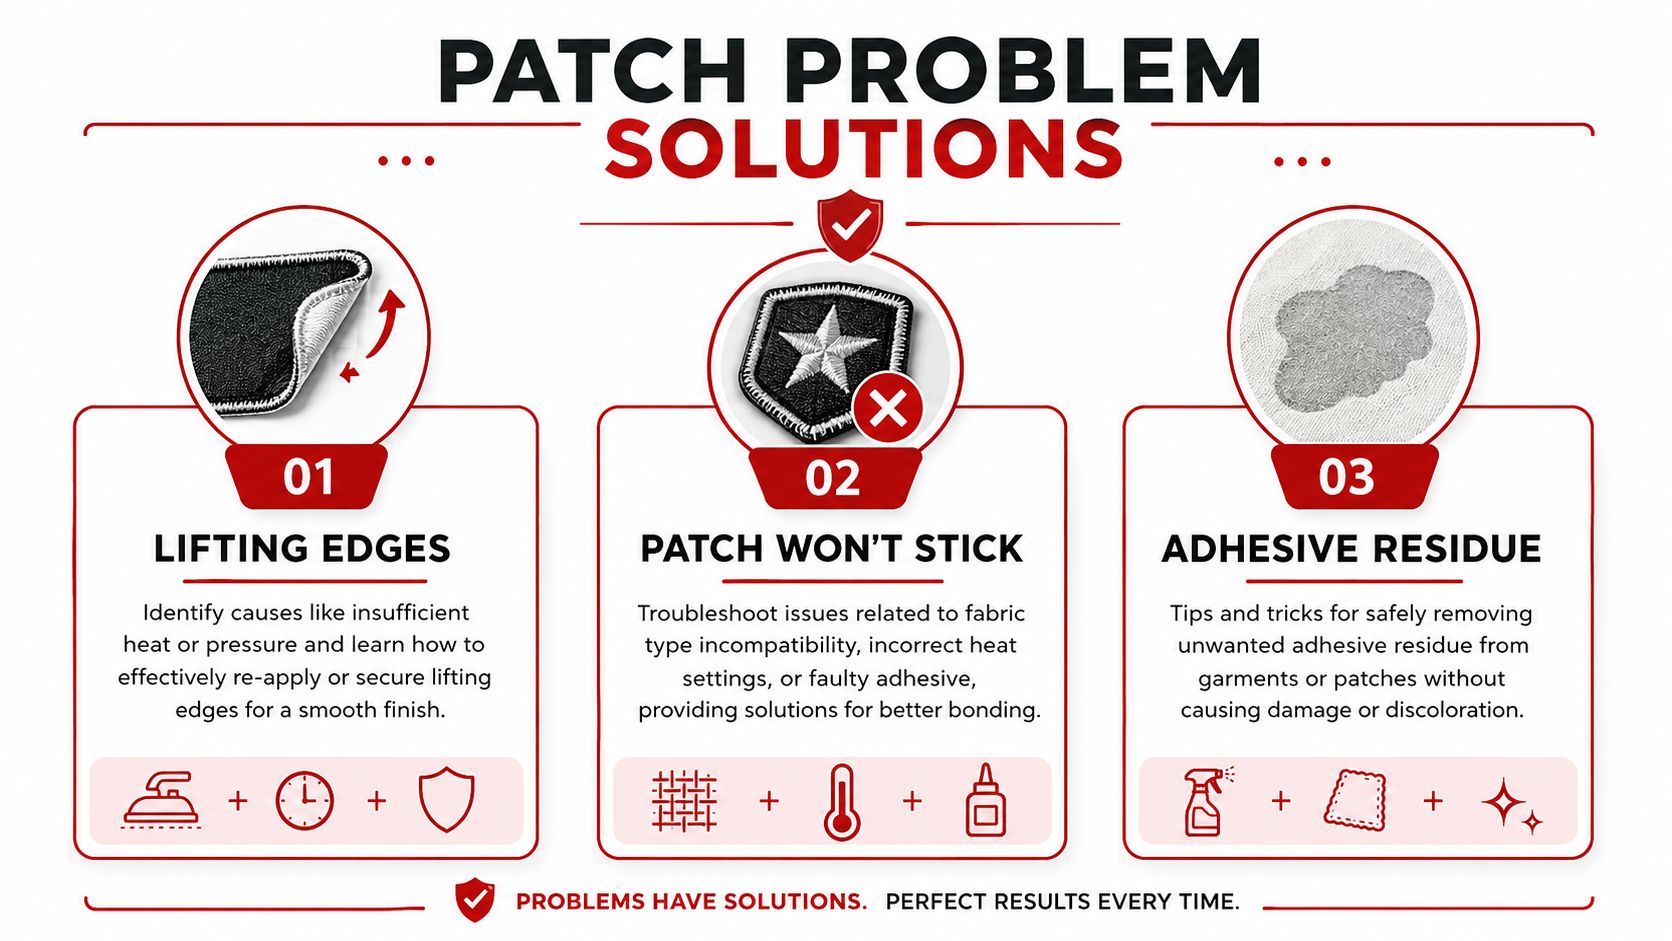
This is the most common complaint on caps. The center of the patch looks attached, but one corner or side starts curling.
The usual causes are:
- Uneven pressure on the curved crown
- Patch too stiff for the panel shape
- Fabric texture preventing full contact
- Movement too soon after pressing
If the patch is otherwise compatible with the hat, you can sometimes re-press it with better support under the panel. If the hat fabric is the primary issue, switch to stitching the edge before it gets worse.
The patch won't stick at all
When a tiger iron on patch refuses to bond, people often assume the adhesive is defective. Sometimes it is. More often, the hat surface is the issue.
A patch backing needs direct, sustained contact with the fabric. Hats with coating, moisture resistance, mesh, heavy contour, or unstable front structure don't always give the adhesive a clean target.
The patch isn't stubborn. The surface is rejecting the method.
If the patch keeps releasing after multiple attempts, stop applying more heat. That usually makes the situation worse and can mark the cap. At that point, sewing is the fix.
You scorched or marked the hat
This happens fast on the wrong headwear. Shine marks, flattened nap, warped buckram, and panel distortion usually mean the hat took more heat than it should have.
Try this approach:
- Let the hat cool fully before judging the damage
- Don't re-press immediately out of frustration
- Check whether the crown structure changed or only the surface finish
- Move to a sew-on solution if the fabric already looks stressed
Adhesive residue and messy edges
Residue usually shows up when the patch shifted during application or the adhesive softened unevenly. On hats, that can happen when the patch bridges over a curve instead of laying flush.
The cleanest prevention is simple. Use the right patch size for the panel, hold it in place securely, and don't overwork the adhesive with repeated attempts.
Keeping Your Patch Perfect Through Washing
Application gets all the attention, but aftercare is what decides whether the patch still looks good later. Many hat projects often fail due to insufficient aftercare.
Generic patch advice often says to wait a day before washing. That's good advice, but it doesn't go far enough for headwear. A 2024 study found that 68% of iron-on patches on jeans peel after 10 washes, and curved hat surfaces can speed up that failure because the fabric is already under tension, according to this iron-on patch FAQ and wash durability discussion.
What to do right after application
The first mistake is wearing or flexing the hat too soon. Let the adhesive settle.
For best results:
- Wait before the first wash. Give the bond time to set.
- Avoid bending the patched area. Constant flexing starts at the edge.
- Keep the hat away from extra heat. Dryers are rough on adhesive-backed patches.
The care routine that actually helps
If the hat has to be cleaned, be gentle.
- Spot clean first when possible
- Use cool water rather than hot
- Skip high heat drying
- Handle the patched area lightly instead of scrubbing it
That last point matters. Hats don't wash like T-shirts. The crown shape, seam tension, and patch stiffness all create stress points.
Care takeaway: The dryer ruins more patch jobs than the washer.
If the hat is meant for regular use, team wear, or repeated cleaning, stitched edges are usually the safer long-term move.
A Smart Guide for Businesses and Brands
If you're ordering hats for a business, sports team, merch line, or event, the decision isn't just “Do I like this tiger patch?” The primary question is whether the patch method fits the hat style, the use case, and the reordering plan.
That's where people waste money. They choose an iron-on patch because it looks flexible on paper, then try to apply it across modern synthetic caps and end up reworking inventory.
The big fabric compatibility problem
This is the issue most generic content misses. A 2025 industry report says 42% of DIY patch applications on synthetic blends fail within 30 days because of adhesive melting or poor bonding on treated surfaces, based on this discussion of common iron-on patch mistakes.
That should change how you think about hat selection.
Many popular team and promo caps use performance-oriented materials. Those fabrics can be great for wear, but they're not always friendly to iron-on backings. If you're decorating polyester-forward or treated headwear, sewing or patch-ready production methods are usually safer than a DIY iron pass.
When patches make sense for brands
Patches are a strong option when you want a layered, heritage-style look that direct embroidery doesn't quite match. They also help when your design needs a border, shape, or texture that stands apart from stitching directly into the crown.
For small test runs, low minimums can make patch-based headwear easier to sample before a full launch. That's especially useful for startups and event planners who want to check artwork in real life before scaling.
If you're comparing sourcing approaches, this guide on buying custom hat patches wholesale is a practical place to start.
How to choose the right route
For business orders, I'd sort it this way:
- Cotton or cotton-forward hats usually give iron-on methods a better chance.
- Performance synthetics should raise a red flag.
- Frequent-wear promotional hats deserve stitched security.
- Retail or influencer merch should prioritize finish quality over shortcut application.
If you're sending branded hats to creators or partners, packaging and presentation matter too. For teams planning seeded product outreach, Apply for gifted collaborations is a useful example of how brands organize product gifting in a structured way.
The short version is simple. Don't choose the patch first and the hat second. Choose the hat and application method together.
Frequently Asked Questions About Iron-On Patches
Can I iron a tiger patch onto a beanie
Sometimes, but beanies are tricky. The stretch works against clean adhesion, and the knit texture doesn't always give the backing an even surface. If the beanie will be worn often, stitched attachment is usually the better call.
Can I iron one onto a structured trucker hat
You can try, but this is one of the most failure-prone applications. Structured fronts and curved crowns make pressure inconsistent, and the material mix may not love heat. For truckers, stitched edges or a sew-on patch setup is usually more dependable.
What's the difference between embroidered, woven, and printed patches
Embroidered patches have raised thread texture and a classic bold look.
Woven patches capture finer detail with a flatter surface.
Printed patches can handle more photographic or complex artwork but don't give the same stitched feel.
For tiger graphics, embroidered usually wins when you want a bold, traditional look. Woven can be better if the artwork has tighter line detail.
Can I remove an iron-on patch later
Yes, sometimes, but removal can leave residue, fabric distortion, or heat marks. Hats are less forgiving than flat garments. If the cap matters, test carefully and expect some cleanup.
Is iron-on alone enough for hats
Sometimes on the right hat. Not always on real-world headwear. If the item will be washed, flexed, shipped, resold, or worn hard, stitched reinforcement is usually the safer choice.
What patch shape works best on a hat
Shapes with cleaner borders and moderate size tend to behave better than oversized or highly irregular shapes. The more the patch has to bend across a curved panel, the more likely an edge issue becomes.
Should I press the patch again if one corner lifts
Only if the fabric can handle it and the original problem was clearly uneven pressure. If the hat material is incompatible, more heat won't solve it. It just raises the chance of damaging the cap.
If you need blank hats, custom embroidery, or patch-ready headwear for a small test run or a larger wholesale order, Dirt Cheap Headwear makes the process easy with low minimums, fast turnarounds, and a wide selection of styles built for brands, teams, and events.