
How Are Embroidered Patches Made Step by Step
You've approved a logo, chosen a hat or uniform, and now you're deciding whether the design should become an embroidered patch. The artwork may look simple on screen, but a durable patch depends on decisions that aren't visible in the original file: stitch direction, fabric stability, border construction, backing, and the material receiving the patch.
So, how are embroidered patches made? A shop converts artwork into a stitch file, sews the design onto a stable base such as twill or felt, trims and finishes the piece, then applies a backing suited to the garment. The best result comes from treating the patch as a small engineered product, not just a graphic with thread on it.
Translating Artwork into a Digitized Stitch File
A patch starts with digitizing, not with the embroidery machine. Digitizing converts artwork into a machine-readable map that tells the needle where to penetrate, which direction each stitch should take, how densely areas should be filled, when colors should change, and which design elements should be sewn first. This is why handing a shop a high-resolution JPEG doesn't automatically produce a clean embroidered result.
A JPEG describes pixels. A vector logo describes shapes and paths. Neither one, by itself, tells an embroidery machine how to build those shapes from thread. A digitizer must interpret the artwork and create separate stitch regions with practical boundaries, underlay, sequencing, and compensation for the way fabric and thread behave.
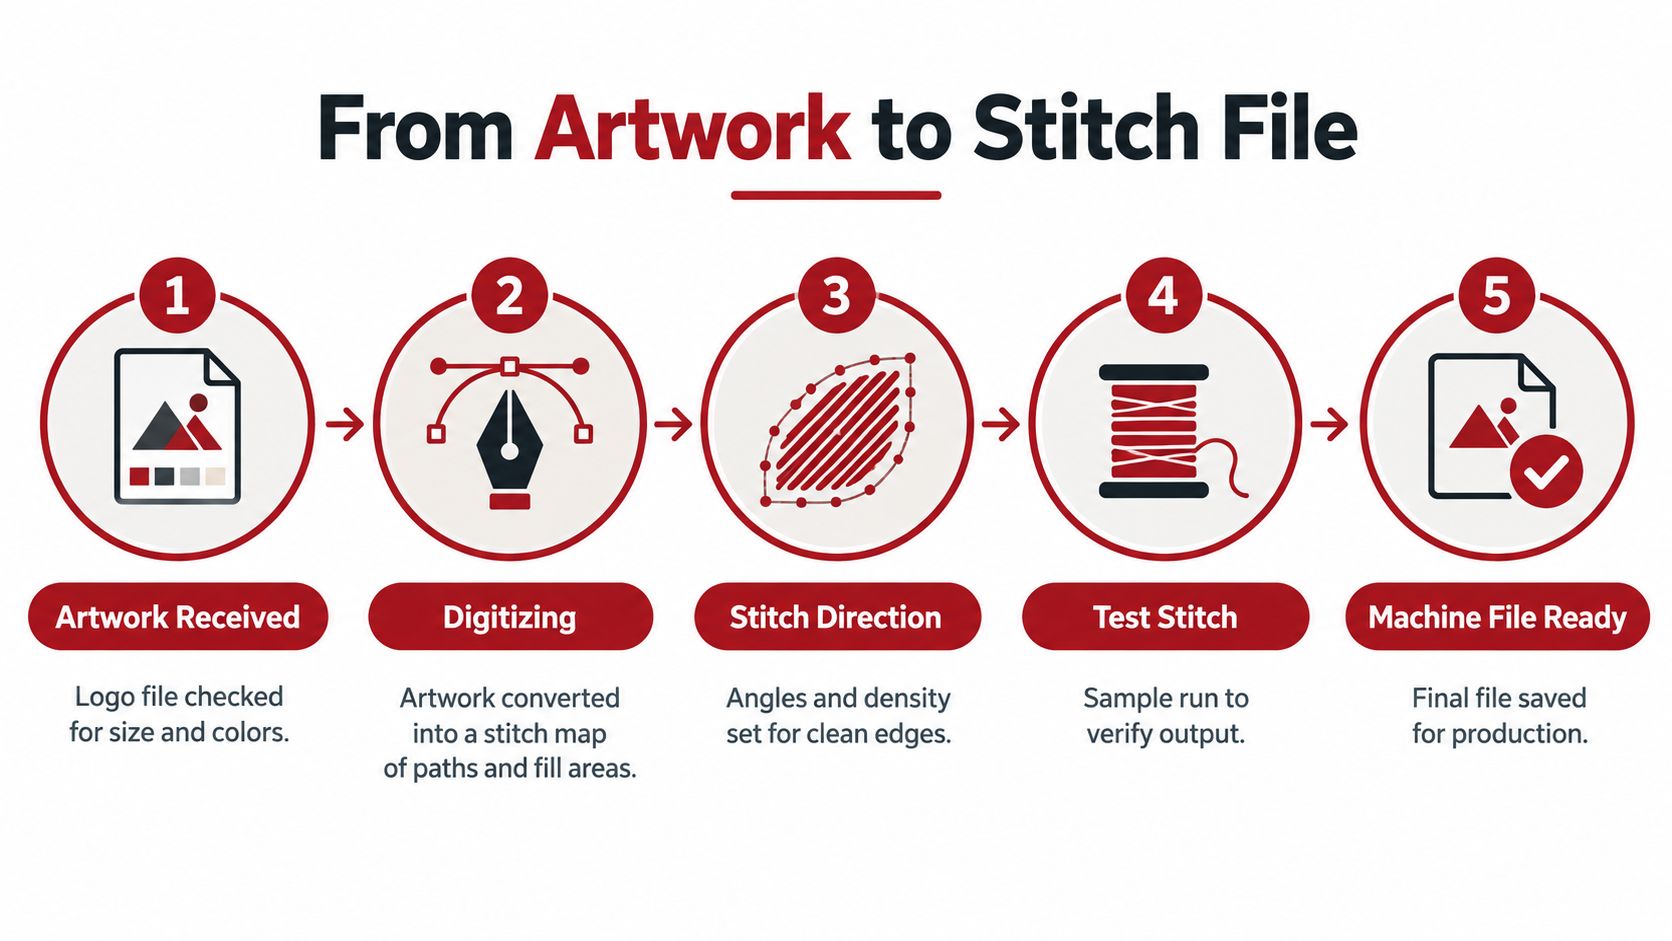
What the digitizer decides
The first pass cleans up the supplied logo. Tiny gaps, overlapping shapes, unnecessary points, and details that are too fine for thread may need adjustment. A good vector file helps, but it still needs to be translated into embroidery logic. A thin line might become a narrow run stitch, a broad area might use a fill, and an outline may require a dense satin border.
Underlay goes down beneath visible stitching to stabilize the base and give the top thread something consistent to sit on. Stitch direction also matters. Changing angles can define shapes and reduce the flat, printed appearance of a patch, while poor sequencing can create unwanted pull, gaps, or uneven joins.
Density needs restraint. Too many stitches packed into a small area can stiffen the patch and cause puckering. Too few can leave the twill or felt showing through. Fine lettering is especially unforgiving because thread has a physical width. A digitizer may need to simplify letterforms, increase their size, or alter the stitch type rather than reproduce every detail exactly.
For a more detailed look at the file-preparation stage, see this guide to digitizing a logo for embroidery. The practical takeaway is simple: approve the stitch interpretation, not just the artwork on a screen.
Sequence controls texture
The machine follows the programmed order of operations. Background fills, lettering, outlines, and borders need to be arranged so later stitches cover joins and secure edges without burying important details. Color changes are part of that sequence, but so are trims and travel paths between separate areas.
A professional shop should test the digitized file at the actual production size. A logo that looks sharp on a large monitor can lose clarity when reduced to a small hat patch. A physical sew-out exposes problems that a screen preview can't show, including thread tension, excessive density, weak coverage, and border distortion.
Practical rule: A successful embroidered patch file is not a traced picture. It's a set of manufacturing instructions designed around thread, fabric, needle movement, and the final size.
Hooping the Substrate and Running the Embroidery Machine
Once the stitch file is ready, the operator chooses the physical base. Twill, felt, and canvas are common substrates because they offer a stable surface for thread and can support a finished border. The choice depends on the patch's look, stiffness, intended garment, and the amount of detail in the design.
The base material is placed with an appropriate stabilizer and secured in a hoop or frame. The operator needs enough tension to prevent movement, but not so much that the substrate stretches or distorts. Inadequate stabilization allows fabric movement, registration errors, and puckering, a relationship also documented in an embroidery-quality study on interfacing and thread tension.
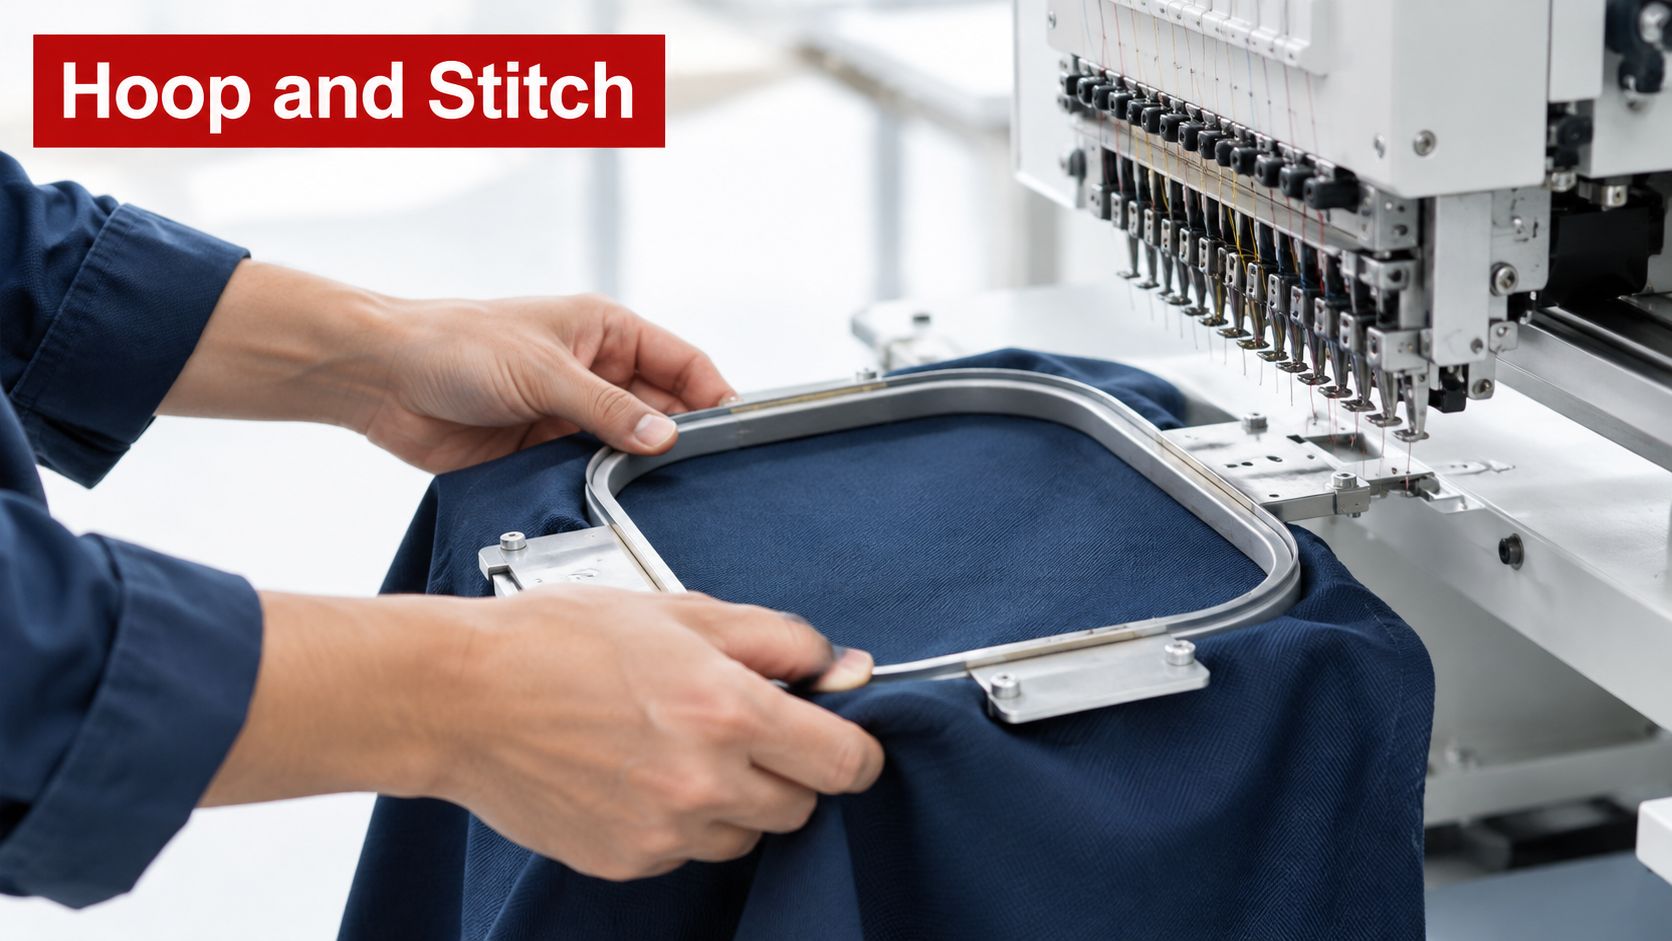
A patch is built in layers
The first stitches commonly establish placement. A placement outline shows where the patch material belongs, followed by a tack-down stitch that holds the substrate in position. The machine then works through fill areas, lettering, details, and the outer border according to the digitized sequence.
The border often uses dense satin stitching. Besides giving the patch a finished outline, it helps protect the edge from fraying. After stitching, the operator trims excess thread and prepares the patch for its selected backing.
Modern commercial embroidery machines can run at speeds of up to approximately 1,200 stitches per minute according to a production overview from Zorwild's embroidery patch capability page. Speed supports repeatability, but it doesn't replace setup skill. Dense designs, unstable substrates, and difficult thread paths may require adjustments so the machine doesn't pull the base out of registration.
Watch the machine sequence closely and you'll see why the file and physical setup must agree.
Tension is a physical variable
Thread tension affects whether stitches lie smoothly on the surface or pull, loop, and expose the backing. The correct setting depends on the thread, substrate, stabilizer, density, and machine conditions. A file that worked on one base may need a test and adjustment on another.
This is why experienced operators don't rely only on a digital preview. They run a sample, inspect the border and registration, and adjust stabilizer or tension before approving the production run. The machine creates the visible design, but the operator controls the conditions that let that design survive the process.
Choosing the Right Backing for Your Garment Material
Backing isn't a cosmetic add-on. It determines how force transfers between the patch and the garment, how the item behaves during washing, and whether the patch can be removed later without destroying the underlying material.
Sew-on backing uses thread to mechanically anchor the patch. It generally offers the strongest long-term attachment, especially on frequently washed apparel or heavy workwear. The trade-off is installation time and the need for a needle path that won't damage the garment.
Heat-seal or iron-on backing is faster and cleaner for many applications. It relies on adhesive activated by heat and pressure, so the result depends on the receiving material, the temperature, the pressure distribution, and the care routine. Heat-seal patches can lift after repeated washing or high-heat exposure, as described in this comparison of custom patch backing options.
Hook-and-loop backing serves a different purpose. It makes a patch removable and interchangeable, which suits uniforms, bags, and gear that carry changing identifiers. It adds bulk and usually requires a compatible loop panel on the garment.
| Backing Type | Best For | Avoid Using On |
|---|---|---|
| Sew-on | Frequently washed apparel, heavy garments, long-term use | Garments where needle holes or visible stitching aren't acceptable |
| Heat-seal or iron-on | Fast application to compatible, heat-tolerant fabrics | Nylon, waterproof fabrics, leather, wool, knitted garments, silk, and technical fabrics such as GORE-TEX |
| Hook-and-loop | Removable identifiers, uniforms, interchangeable branding | Smooth garments without a loop panel or applications where added bulk is a problem |
Match the backing to the garment
Curved hat panels create a common problem. Heat and pressure are harder to distribute evenly across a structured cap than across a flat jacket panel. If the adhesive doesn't bond consistently, the corners or edges can lift even when the patch itself was embroidered correctly.
Stretch also matters. A rigid patch on a flexible knit can resist the garment's movement and stress the attachment. Before ordering, tell the shop whether the patch will go on a cotton cap, nylon outerwear, a knit garment, a waterproof shell, or a structured hat. This guide to selecting patch backing can help frame that conversation.
The patch surface may be durable while the attachment fails. Evaluate both parts separately.
Washing instructions should follow the weakest component. If the garment requires high heat or aggressive laundering, sew-on is usually the safer choice. If the patch needs to be replaced during a rebrand, hook-and-loop or carefully planned sew-on construction may be more useful than permanent adhesive.
Quality Control and Inspecting the Physical Proof
A polished proof isn't just a courtesy. It is the point where a buyer can catch a manufacturing problem before that problem reaches an entire batch. Approve the physical sew-out at the final production size, on the intended patch base whenever possible.
One documented industrial case study reviewed 2,889 embroidered items and recorded an overall defect rate of 3.46%, with 93% of defects originating in manufacturing, often alongside design-stage problems. The same case study identified missed trims, incomplete coverage, and unraveled threads as recurring defect categories. These figures don't predict the result of every shop, but they show why production control deserves attention. The industrial embroidered-textile defect case study provides the underlying documentation.
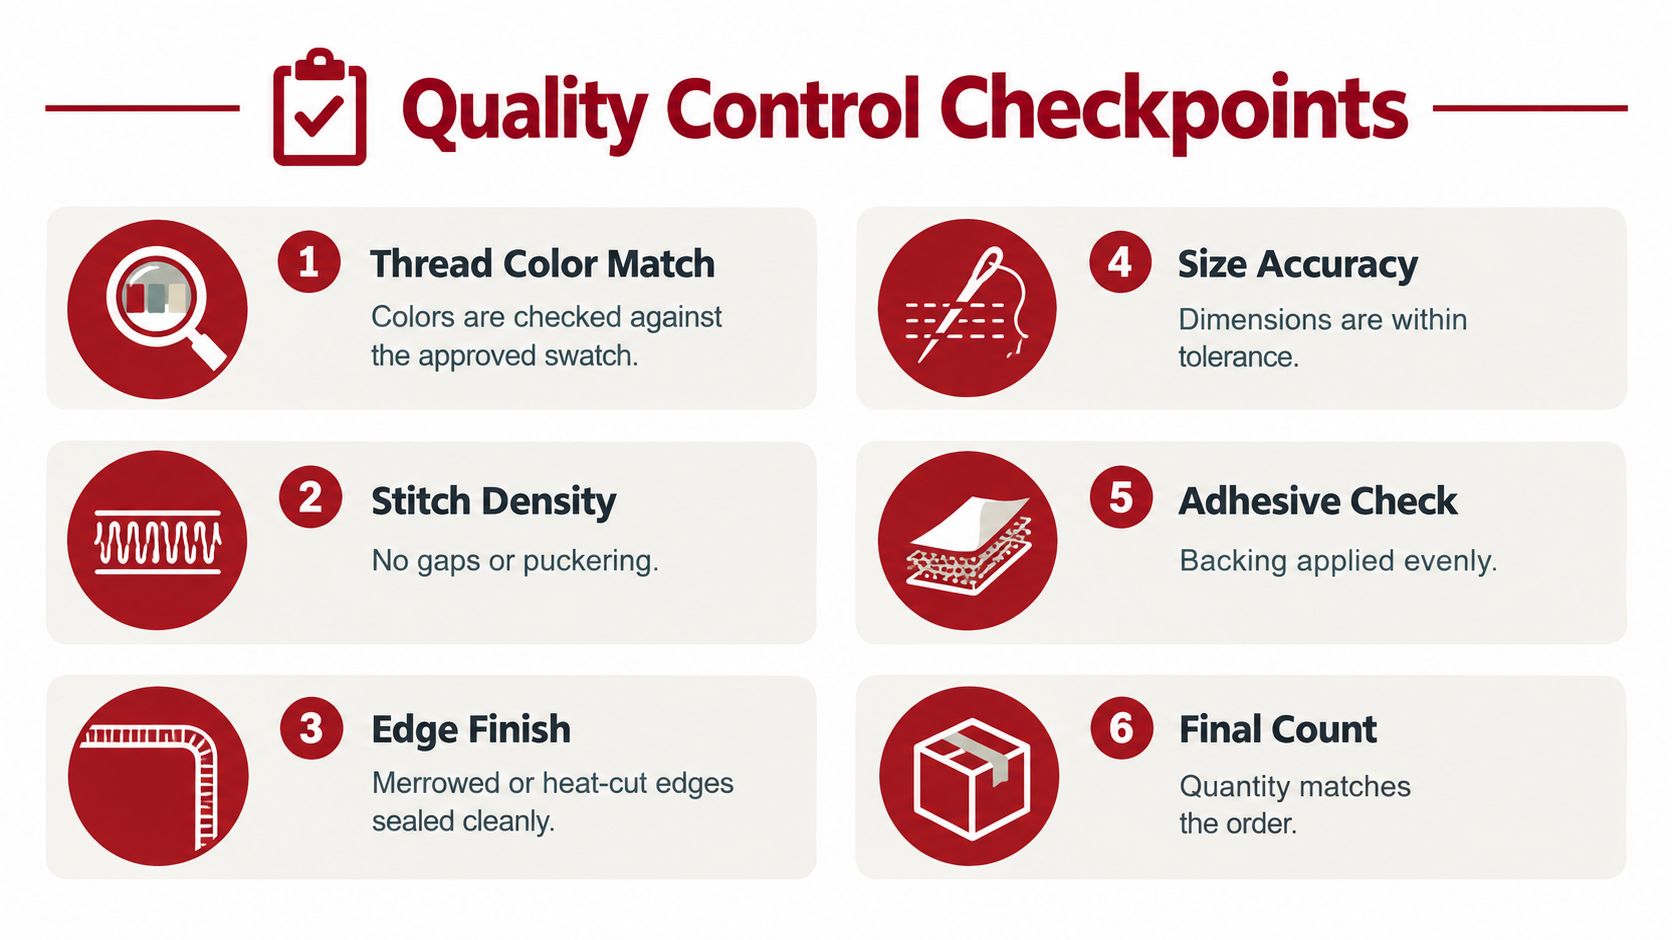
Inspect the first sew-out
A proper inspection looks beyond whether the logo is recognizable. Use bright, even light and check the patch face, perimeter, and underside.
- Thread coverage: Look for exposed base fabric where the design should be filled.
- Registration: Confirm that fills, lettering, outlines, and the border meet their intended edges.
- Thread tails: Check for loose ends, untrimmed jump stitches, and unsecured thread paths.
- Border continuity: Inspect the satin border for gaps, thin spots, uneven width, or fraying at the edge.
- Surface behavior: Look for puckering, looping, excessive stiffness, or areas where stitches pull the substrate out of shape.
- Backing finish: Confirm that adhesive, heat-seal, or hook-and-loop material sits evenly and doesn't extend unpredictably beyond the patch.
For teams that need a repeatable way to assess wear, a resource on durability testing for daycare labels offers a useful testing mindset. The materials differ, but the principle carries over: define the expected use, expose a sample to that use, and record how the decoration changes.
Set tolerances before production
A buyer and shop should agree on what counts as acceptable before bulk production begins. That might include the approved thread colors, final dimensions, border appearance, backing position, and the level of detail expected at the selected size.
Sample finished pieces throughout the run rather than checking only the first item. Operators should also verify that the machine continues to trim correctly and that thread tension remains stable as production proceeds. More practical production safeguards appear in these quality assurance tips for decorated apparel.
Designing for Durability and End of Life
Permanent attachment isn't automatically the most responsible choice. A heat-seal patch may stay firmly attached during the garment's useful life, but that same bond can make removal difficult when the logo changes, the garment is resold, or the fabric needs to enter a recycling stream.
An embroidered patch can combine polyester or rayon thread, twill or felt, adhesive, and plastic-based backing. When the patch is attached to a garment made from a different fiber, the combined construction can complicate textile sorting and recycling, as outlined in this discussion of embroidered heat-seal patch materials.
Design for removal
Start with the garment's expected future, not only its first use. A one-time event shirt may need a simple decoration. A startup uniform may carry a revised logo later. A sports program may reuse jackets across seasons, while a promotional cap may be resold after a campaign ends.
Three approaches create different lifecycle outcomes:
- Direct embroidery: The decoration becomes part of the garment itself. It avoids a separate patch layer, but changing the logo usually means covering, removing, or replacing the item.
- Removable sew-on patch: Thread provides a durable attachment while preserving the possibility of careful removal. Needle holes may remain, so the garment still needs to be evaluated.
- Permanent heat-seal patch: Adhesive offers convenient application, but removal can leave residue, damage the fabric, or require heat that the garment can't tolerate.
A removable design isn't always the answer. Sew-on construction can be the most dependable option in demanding use, yet durability during wear and ease of recycling are separate goals. Make the trade-off explicit.
For rebrands and short campaigns, ask whether the garment needs to outlive the patch. If it does, choose an attachment that supports repair, reuse, resale, or replacement. Ask the decorator what the thread, base fabric, adhesive, and backing are made from, and avoid unsupported sustainability claims unless the material or process has appropriate documentation.
Preparing Your Artwork for a Custom Patch Order
A smooth order starts with a clear production brief. Send the cleanest artwork available, state the finished dimensions, and explain what the patch will touch. The shop needs to know whether the design is going on a curved hat, a washable jacket, a stretch garment, a bag, or a technical outer layer.
Vector artwork is usually the most useful starting point because it preserves shape information during editing. A high-resolution PDF can also help, especially when the original designer no longer has the working file. The final stitch file still requires professional interpretation, so don't assume that supplying an AI or EPS file removes the need for digitizing.
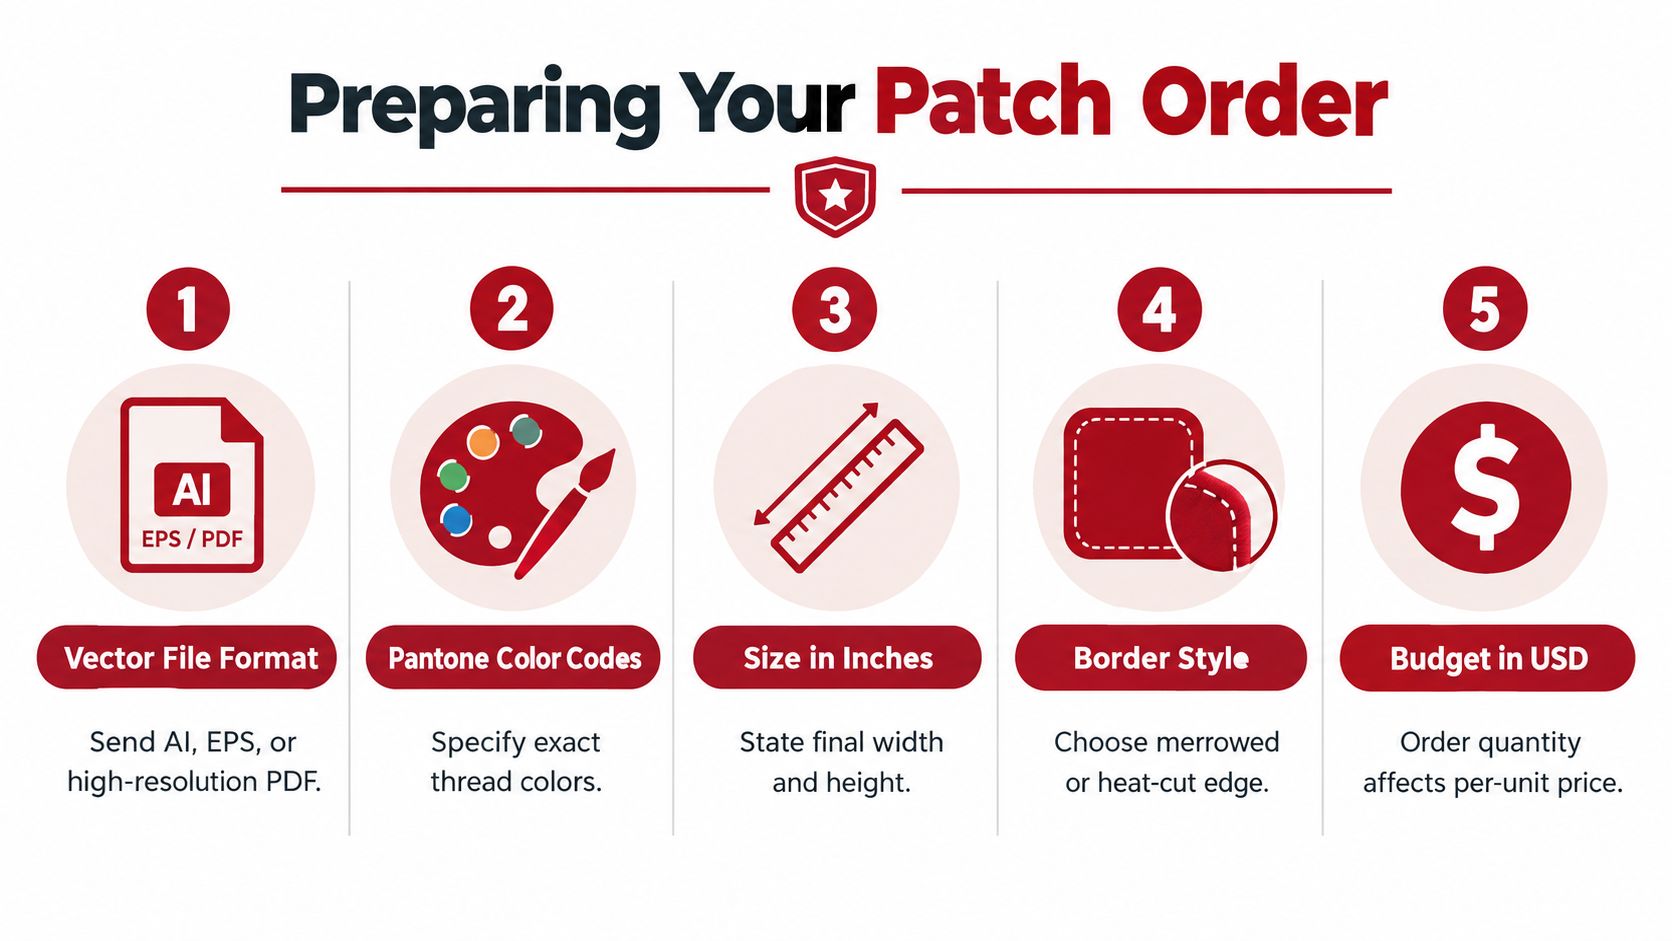
Give the shop decisions it can use
Include these details in the first message:
- Artwork file: Send an AI, EPS, or high-resolution PDF when available. Include a raster preview so the shop can compare the proof with the intended logo.
- Color direction: Identify brand colors and, when your team uses them, provide Pantone references or an approved physical swatch. Thread is not ink, so the shop may need to match the closest available thread.
- Finished size: State the final width and height in inches. Tell the shop whether the dimensions are fixed or whether slight proportional adjustment is acceptable.
- Border preference: Choose a merrowed or heat-cut edge, or ask which finish suits the shape and level of detail.
- Application material: Name the garment fabric, whether it stretches, how it will be washed, and whether it has a curved or structured surface.
- Backing requirement: Request sew-on, heat-seal, adhesive, or hook-and-loop based on the actual use rather than convenience alone.
- Proof expectations: Ask for a physical sew-out or a clearly defined approval process before production.
A useful comparison is preparing artwork for a tattoo session. The artist needs a clear design, placement information, and an understanding of how the final surface changes the work. This overview of how to prep for a tattoo session offers a parallel lesson: good preparation gives the professional the information needed to adapt the design to its real-world setting.
Ask operational questions early
Confirm how revisions are handled, what the proof includes, how the patch will be attached, and whether the shop can produce the patch separately from the garment. Ask about production timing and available quantities without assuming that every design follows the same schedule. Small lettering, dense fills, specialty borders, and unusual materials may require more testing than a simple logo.
Dirt Cheap Headwear offers custom patches with artwork submission, proofing, and production, including applying patches to garments or headwear through stitching or other attachment methods. That makes it one option for buyers who need both patch production and decorated headwear coordination.
Bring a simplified version of the logo if the original contains very fine lines or tiny text. Simplification isn't a compromise in quality. It can be the step that lets the embroidery communicate the brand clearly at its actual size.
Dirt Cheap Headwear supplies blank hats and custom-decorated headwear, along with custom embroidered patches, proofing, and attachment options for businesses, teams, events, and growing brands. Share your artwork, garment material, finished size, and intended use, then visit Dirt Cheap Headwear to request a practical patch or headwear order.