
Bucket Hat Custom Orders: A Complete 2026 Guide
You've got the mockup, the logo, and the event date. What usually comes next is the expensive part, the sample that looks fine on a screen and then turns strange in hand because the brim collapses, the crown sits too deep, or the embroidery pulls the fabric into little waves. A bucket hat custom order lives or dies on those physical details, not on the pretty render, and that's where buyers get caught.
The good news is that the mistakes are predictable. If you know how fabric weight, crown shape, brim width, and decoration placement interact, you can avoid the sample-round whiplash and place an order that holds up in real use. The category itself has enough staying power to justify that attention, with the global bucket hats market valued at USD 400 million in 2025 and projected to reach USD 660 million by 2034, rising from USD 420 million in 2026 at a 5.93% CAGR from 2026 to 2034, while Asia Pacific held 34.54% of the market in 2025 (Fortune Business Insights).
Why Most Custom Bucket Hat Orders Go Wrong
The most common failure starts with the proof. A buyer sees a clean logo on a flat mockup, approves it quickly, then gets a sample that feels off in three different ways at once. The logo sits too close to a seam, the brim sags instead of holding shape, and the decoration looks heavier than expected because the hat itself cannot support the design the way a structured cap would.
The mockup obscures the actual problem
Bucket hats have a soft, collapsible body, so the surface changes as the hat is worn, packed, and folded. A clean vector on a flat screen does not show how the same art behaves on a curved crown or near a flexible brim. The trouble usually starts when the design team treats a bucket hat like a flat-front baseball cap.
Practical rule: If a logo depends on perfect flatness to look right, it is probably too ambitious for a bucket hat.
Placement creates a second failure point. Small logos and side placements often work better than big front graphics because the hat has less rigid structure to support a broad, highly detailed mark. Gemnote notes that bucket hats work best when branding stays subtle and readable, which is why oversized graphics can feel forced on this silhouette.
Why structure beats aesthetics
I have seen orders fail because the buyer picked the hat before the use case. A festival crew gets a deep, heavy style that feels hot and bulky. A premium streetwear drop gets a flimsy, shallow style that looks inexpensive the moment it lands on a shelf. Both problems come from ignoring the fact that bucket hats are not one product, they are a family of constructions with different behaviors.
The fix is simple, but it is easy to skip. Ask how the crown will sit, how the brim is reinforced, and whether the decoration method changes the way the hat folds. If the vendor cannot explain those points clearly, the sample is probably going to reveal a problem you could have caught in the first round. For a quick side-by-side reference on build choices, see this guide to structured vs. unstructured hats. If you also want to sanity-check how a logo will sit on different retail styles, use a tool that lets you preview hats from any store before you commit.
Choosing the Right Hat Structure and Material
A bucket hat can look straightforward on a screen and still ship with problems in hand. Crown depth changes how it sits, brim width changes shade and visibility, and fabric weight changes both the feel and how the hat holds up after it gets folded into a bag.

Cotton twill versus polyester blend versus performance fabric
Cotton twill usually gives the most familiar hand feel. It reads as casual, takes decoration well, and works for merch that should feel a little more substantial. For retail or premium programs, that heavier, more natural texture often helps the hat look finished instead of promotional.
Polyester blends sit in the middle. They are lighter, easier to pack, and a better fit for campaigns where the hats have to ship, travel, and get distributed quickly. That middle ground is why many branded programs choose them.
Performance fabrics are built for use, not just display. They make more sense for outdoor events, warmer weather, and any setting where breathability matters more than a soft, fashion-weight drape. They also handle all-day wear better when the hat gets stuffed into a tote afterward.
If you want a fast visual check before you commit, use a tool that lets you preview hats from any store. It does not replace a sample, but it can show whether a silhouette looks too deep or too shallow before production starts cutting fabric.
Structured or unstructured
Structured crowns hold a cleaner shape. That makes them a better fit for retail drops, premium brand programs, and teams that want the hat to look intentional on a shelf or on staff.
Unstructured versions feel softer and pack down more easily. They suit travel programs, festivals, and giveaway kits because they are less fussy in transit and easier for people to toss into a bag. For a closer look at those construction differences, the comparison of structured versus unstructured hats is useful when you are deciding what silhouette your audience will wear.
The trade-off shows up in cost and finish. A hat that keeps its shape usually needs more construction attention, while a softer build is easier to pack and ship, but can read less polished if the program calls for a cleaner retail look.
Fit is part of structure
A shallow crown with a narrow brim can look sharp in a mockup and still feel flimsy in actual use. A deeper crown with a wider brim gives more coverage, but it also changes visibility and comfort. Pattern-drafting references show that brim angle and crown ratio can be adjusted, which is why the spec should match the setting instead of being chosen by habit. One practical way to test that shape before ordering is to compare a few build options against a physical or digital mockup, then keep the version that fits the audience and the decoration plan. The sample will usually reveal whether the brim feels too floppy or the crown sits too high.
Buy for the use case, not the sample photo. Beach events, staff uniforms, resale collections, and outdoor activations all reward different shapes.
Decoration Methods That Actually Survive Wear
A bucket hat is not a billboard. The fabric moves, folds, and compresses, so the decoration method has to work with that behavior instead of fighting it. The wrong choice won't just look off, it can distort the logo, add uncomfortable stiffness, or fail early after wear and washing.
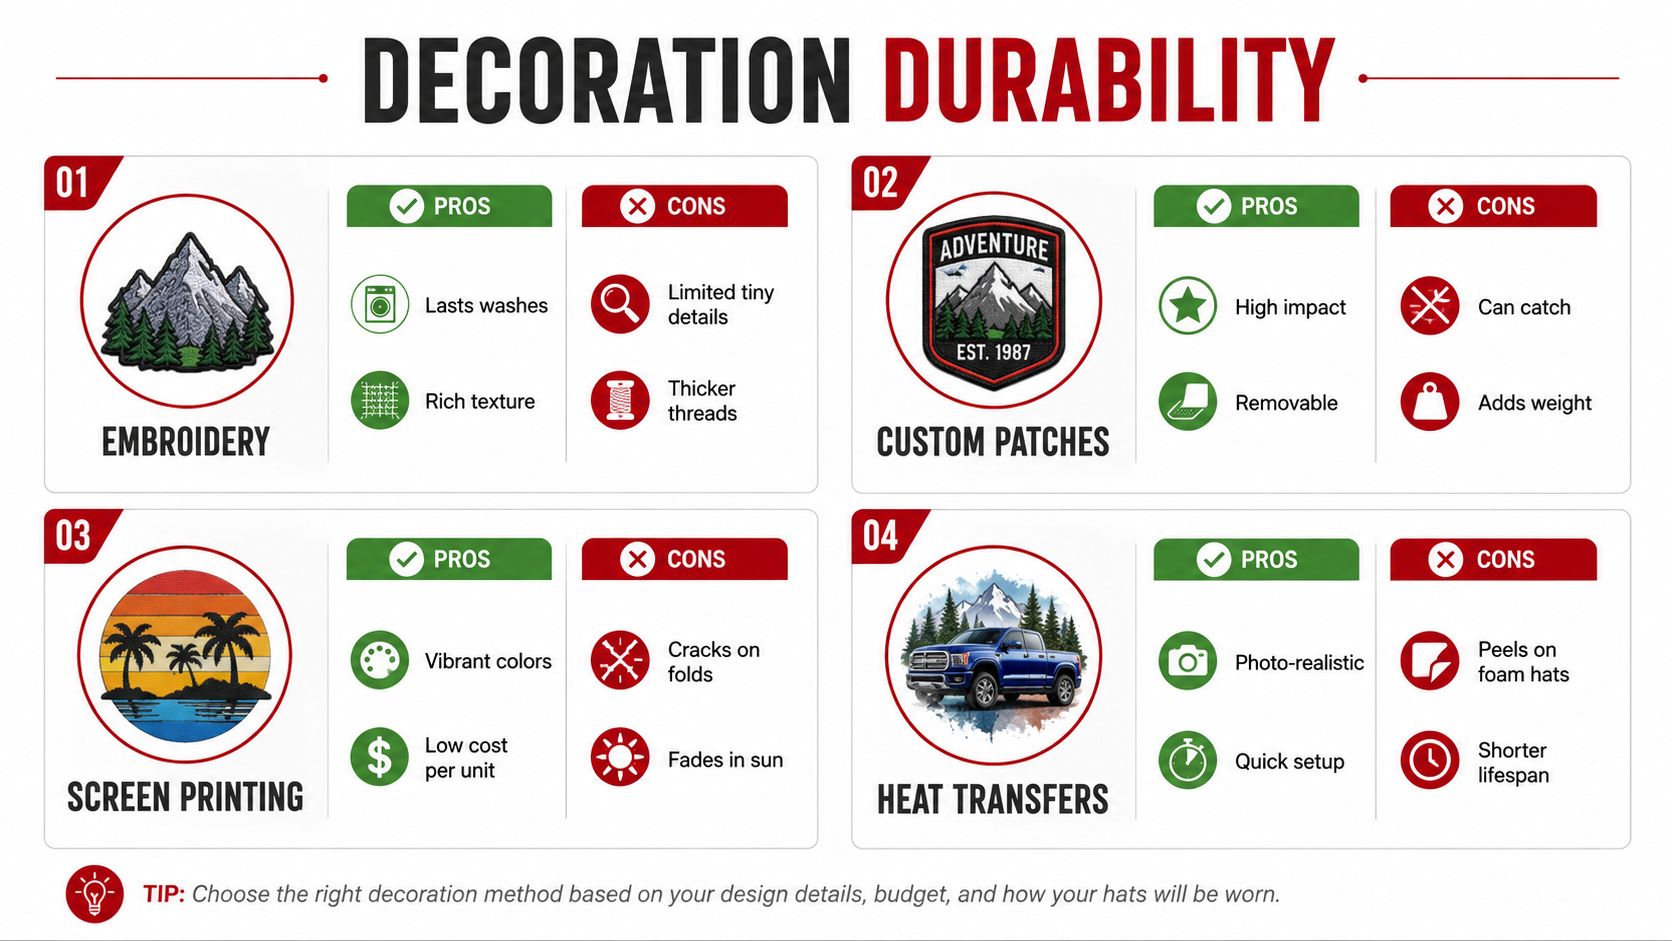
Embroidery still wins for durability
Embroidery is the safest default when the logo is small, clean, and meant to last. It gives the hat texture and depth, and it usually handles repeated use well because the thread sits directly in the fabric. The trade-off is that tiny details can get muddy, and dense stitching can cause puckering if the hat body is too soft.
That's where stitch density matters. A heavy stitch file on a collapsible crown can pull the material in ways that look fine in a digital proof but messy on the actual sample. If the logo needs a lot of tiny text or sharp interior cuts, embroidery may need simplification before it's worth running.
Patches solve the complex-logo problem
Custom patches make sense when the art is too detailed for clean stitching or when the logo has multiple colors that would become expensive or messy in thread. They also create a strong visual hit without forcing every line of art directly into the hat fabric. For brands leaning into vintage, outdoor, or lifestyle aesthetics, patches often fit the look better than direct embroidery.
Screen printing and heat transfers are more limited on bucket hats than buyers expect. Printing can work for certain fabric and design combinations, but fold lines and sun exposure can shorten the life of the artwork. Heat transfers can deliver quick setup and detailed imagery, but they're less forgiving on surfaces that flex and pack often.
Placement beats size
Small front logos and side placements usually outperform oversized front panels on bucket hats. The curved, soft surface makes central art harder to keep crisp, especially if the brim is wide or the crown has little structure. A smaller placement also keeps the hat wearable outside of the promo context, which helps the piece survive beyond the event table.
If you're ordering through a vendor that handles decorated headwear, bucket hat embroidery is the kind of product page worth checking because it shows how a single decoration method behaves on this format. For more nuanced production questions, it's also worth reviewing a digitizing guide like how to digitize a logo for embroidery, since the file itself can be the difference between crisp stitching and a smudged-looking mark.
Preparing Artwork for Production
Good artwork doesn't just look clean, it gives production a file they can build from. A bucket hat's curved surface, seam lines, and soft structure punish sloppy setup, which means the person preparing the art has to think like a decorator, not just a designer.
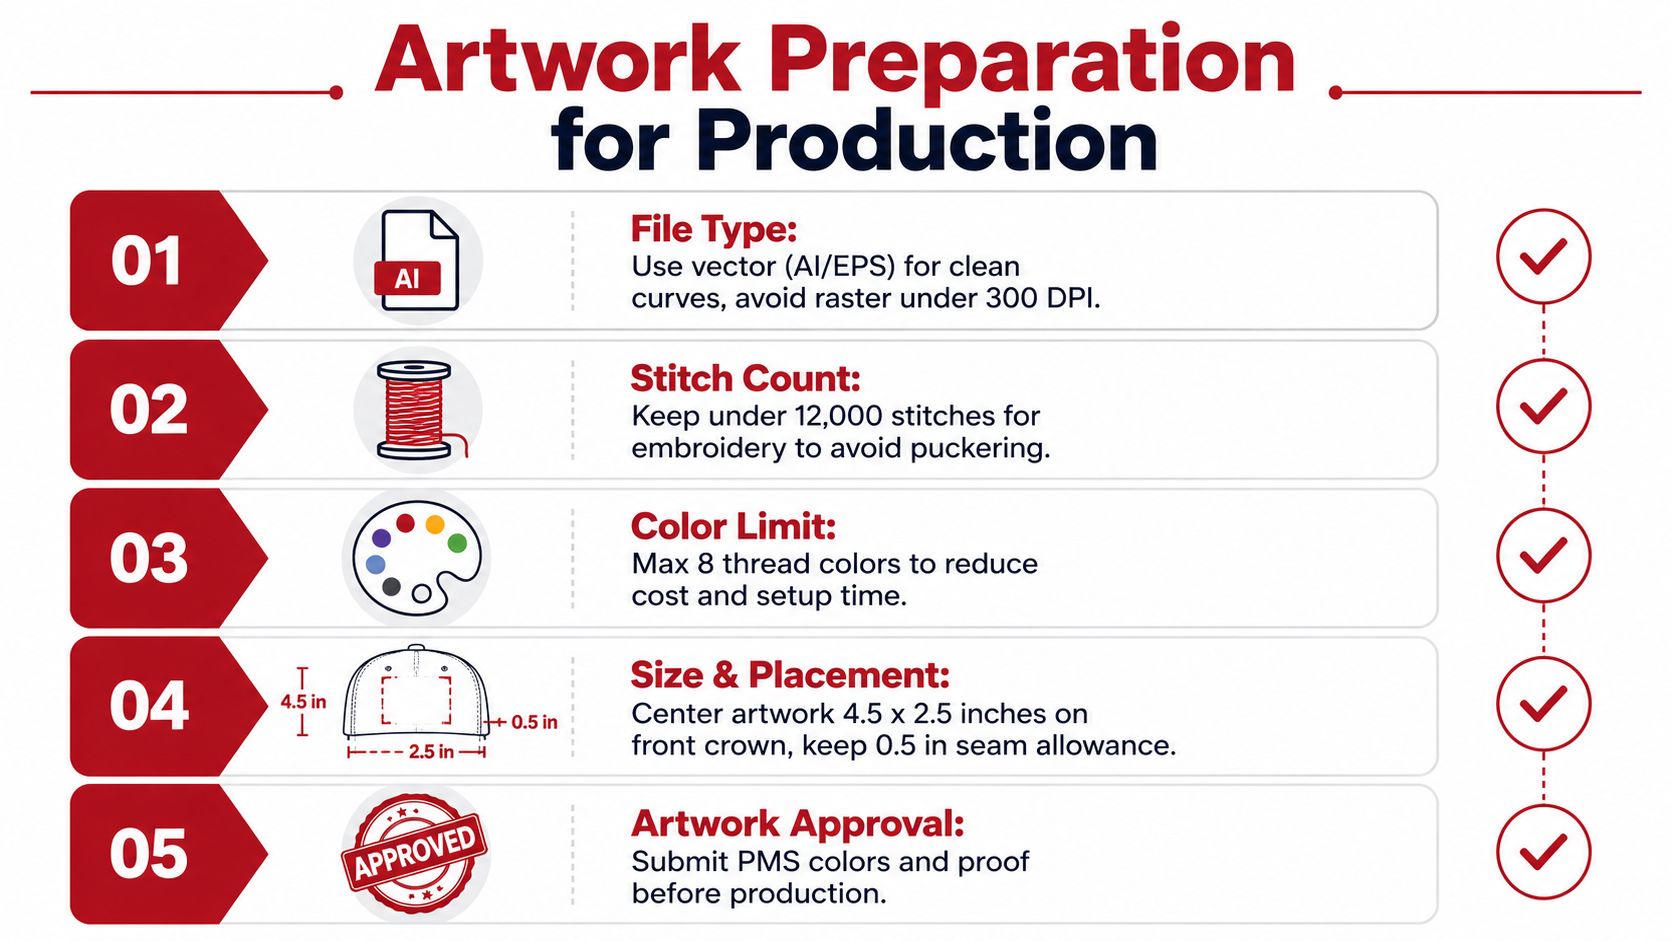
Start with the right file type
Vector art is the safe choice for clean curves, simple fills, and scalable logos. Raster files can work for some print applications, but fuzzy edges and low-resolution artwork create problems fast once the design gets smaller or has to be digitized. If the logo is going into embroidery, the art should be clean enough to translate into stitches without guesswork.
Keep the stitch file realistic
Embroidery has practical limits. A dense, highly detailed logo can eat time, increase setup complexity, and create fabric distortion. A smarter submission keeps detail under control, simplifies fine lines, and respects the fact that bucket hats don't give you the same flat real estate as a structured crown.
Be strict about color and placement
The more colors in a thread or print setup, the more chances there are for cost creep and proof revisions. Keep the palette tight unless the design needs more complexity. Placement also matters, because centering a logo without respecting seams or seam allowance can make the final result look off-balance even when the artwork itself is good.
Ask for a digital proof that shows placement, scale, and thread or print colors before anyone cuts fabric.
If you're handing the art off to a vendor, make sure the proof reflects the actual hat construction rather than a generic silhouette. The ordering process goes smoother when the designer, the digitizer, and the production team are looking at the same constraints, not three different interpretations of the same logo.
Sizing, Fit, and Audience Considerations
A bucket hat can look right on a hanger and still sit wrong on the head. One-size-fits-most only works if the crown depth, brim width, and overall structure match the people who will wear it. Head shape changes the fit. So does how much coverage the buyer expects, how often they plan to wear it, and whether the hat needs to live in a bag, a uniform kit, or a retail rack.
Match the shape to the setting
For staff uniforms and event crews, the safest choice is usually a moderate shape that people can put on fast and forget about. Those orders need hats that stay comfortable through a shift, pack without fuss, and keep a logo visible without making the wearer feel overbuilt. For resale or streetwear, the hat has to do more than carry branding. The silhouette needs enough intent that someone would buy it even if the decoration were removed.
Climate shifts the decision too. A shallow, packable bucket hat fits travel, casual giveaways, and warm-weather promotions where convenience matters more than coverage. A deeper style gives more protection and usually feels better for outdoor work, but it can look heavier and take up more space once it is folded or stored.
Structure changes perceived fit
A structured bucket hat reads more like a retail piece, while an unstructured version feels softer and more relaxed. Neither option is automatically better. The question is whether the crown depth and brim width support the way the hat will be worn, because a style that looks balanced in a flat sample can feel awkward once it sits on a real head.
That is why production specs matter as much as design taste. The same logo can look sharp on one crown shape and crowded on another, especially if the brim is wide or the crown is shallow. If the hat is being ordered in volume, those details affect returns, wear rate, and whether the buyer keeps reaching for the product after the first use.
Recent product demand shows the category moving beyond plain promo wear into more design-led and performance-adjacent versions, which is a sign that buyers want clearer style decisions rather than a single generic option (Gemnote). Pattern-making resources also show that bucket hats are built from adjustable parameters, so fit should be treated like a production spec, not a guess, as outlined in apparel engineering guidance. If you need a retailer-facing version of that same mindset, you can also stand out with Bruce and Eddy when the product needs to be presented with the right commercial context.
Simple filter: choose shallow and packable for portability, deeper and more protective for outdoor wear, and structured when the hat needs a premium retail feel.
Placing Your Order with Dirt Cheap Headwear
The cleanest orders start with one decision, the decoration method. From there, the process usually moves through artwork review, sample approval, bulk production, inspection, and shipment. Independent manufacturing guidance puts the sampling phase at about 7 to 15 days and the bulk production window at roughly 15 to 30 days, with extra time needed for inspection and packing before shipment (Crowns Forge).
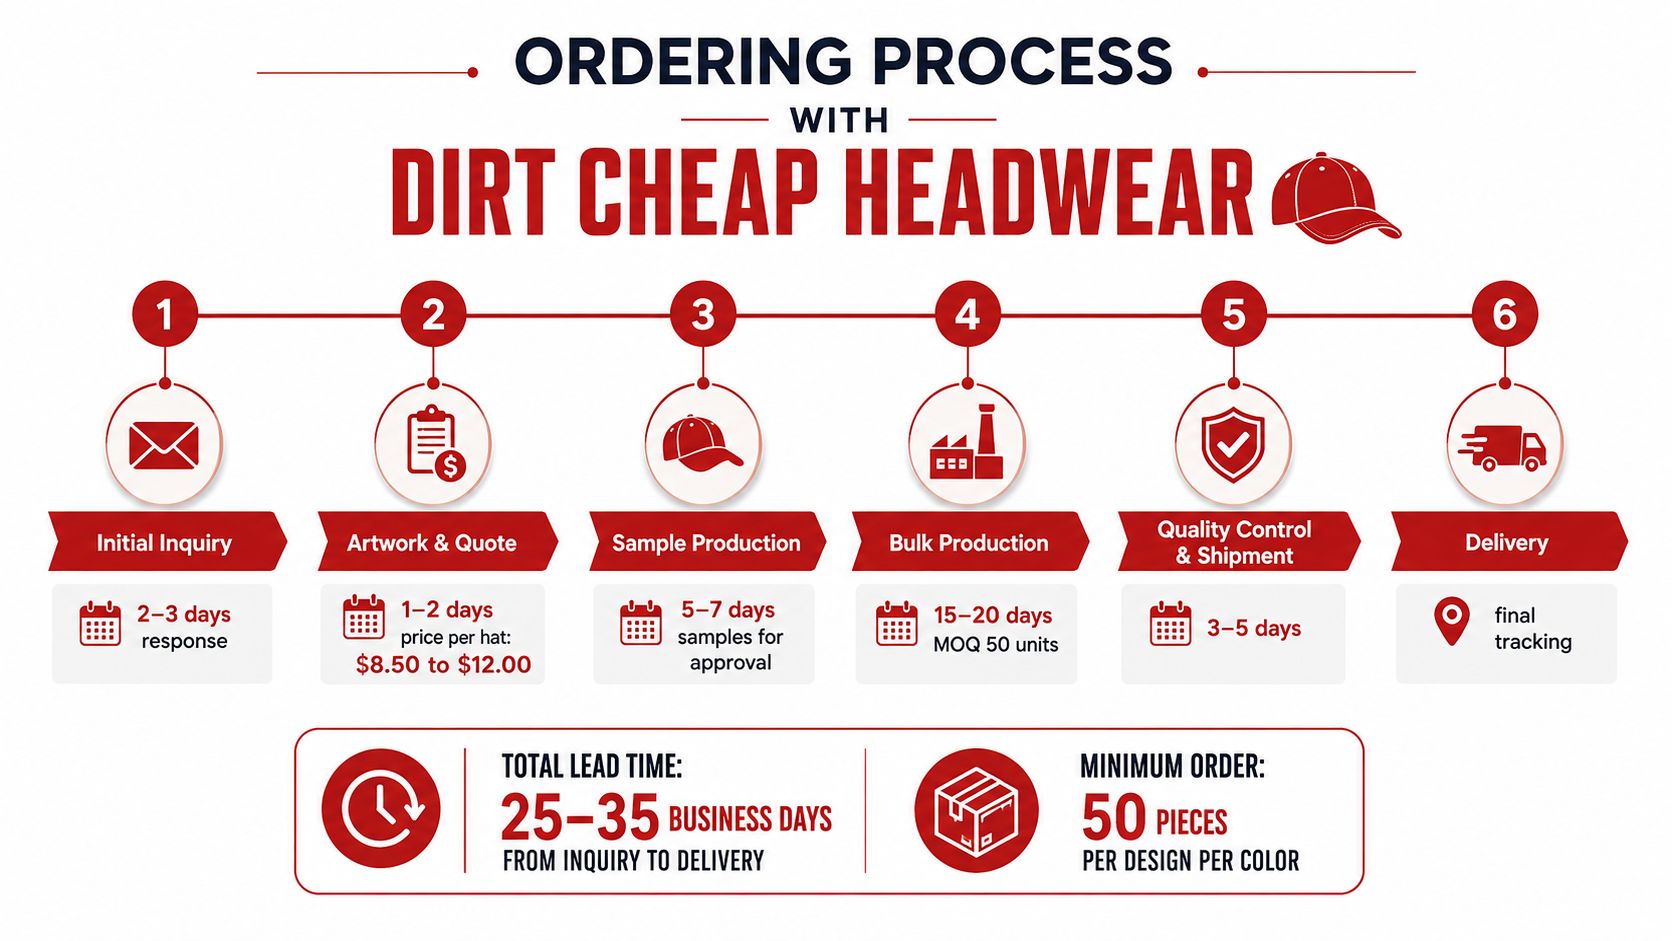
What to send first
Send the logo, the preferred placement, the hat color, and the intended use. That gives the production team enough information to tell you whether embroidery, a patch, or a different setup makes more sense. If the order needs multiple variants, separate them clearly so the proof doesn't blur the differences.
What to approve carefully
Never approve a sample just because it's close. Check scale, seam interaction, thread or print color, and whether the hat sits the way you expected. Revisions are easier before bulk production starts, and that's where most budget blowups can be avoided.
Why communication matters
The fastest way to slow an order down is vague feedback. If a logo needs to move, say how far and in what direction. If a crown feels too deep, ask whether a different silhouette is available rather than assuming a rerun will fix it.
For teams that want to stand out through online selling as well as the physical product, stand out with Bruce and Eddy can be a useful reference point for how a headwear brand presents and sells a product line digitally. That matters because the order doesn't end at production, it ends when the buyer understands the item and wants to wear it.
If you want a custom bucket hat order handled with practical production advice, clear proofing, and decoration choices that make sense on the actual hat, visit Dirt Cheap Headwear. They work with blank and decorated headwear, including bucket hats, and they can help you line up the structure, art, and order details before you spend money on the wrong sample.