
Beanie Embroidery Guide for Brands and Teams
You've approved the logo, chosen a warm knit, and ordered branded beanies for the team. Then the samples arrive: the lettering is hard to read, the stitches have sunk into the ribbing, and the front panel feels stiff instead of comfortable. The mockup looked sharp. The finished beanie doesn't.
That gap between screen design and sewn product is where most beanie embroidery problems begin. Stretchy knit fabric needs different treatment from a polo, dad hat, or structured cap. The decorator has to control stretch, texture, thread tension, stitch density, and placement at the same time. Get those details right and embroidery gives a beanie a durable, premium identity. Ignore them and you'll pay for rework, replacements, or a product your customers won't want to wear.
Why Beanie Embroidery Is Trickier Than It Looks
A small business owner usually approaches a custom beanie with a simple assumption: send over the logo, pick thread colors, and let the decorator sew it. That process works reasonably well on stable fabrics. A knit beanie is different because the fabric stretches under the needle, shifts during hooping, and has raised loops that can swallow fine stitches.
A typical failure appears after production, not during the design approval. The logo may pucker around a dense fill, the edges may lose definition, or the whole decoration may feel rigid against the forehead. A decorator who uses the same settings for a beanie and a structured cap is asking the knit to behave like a firm woven panel. It won't.
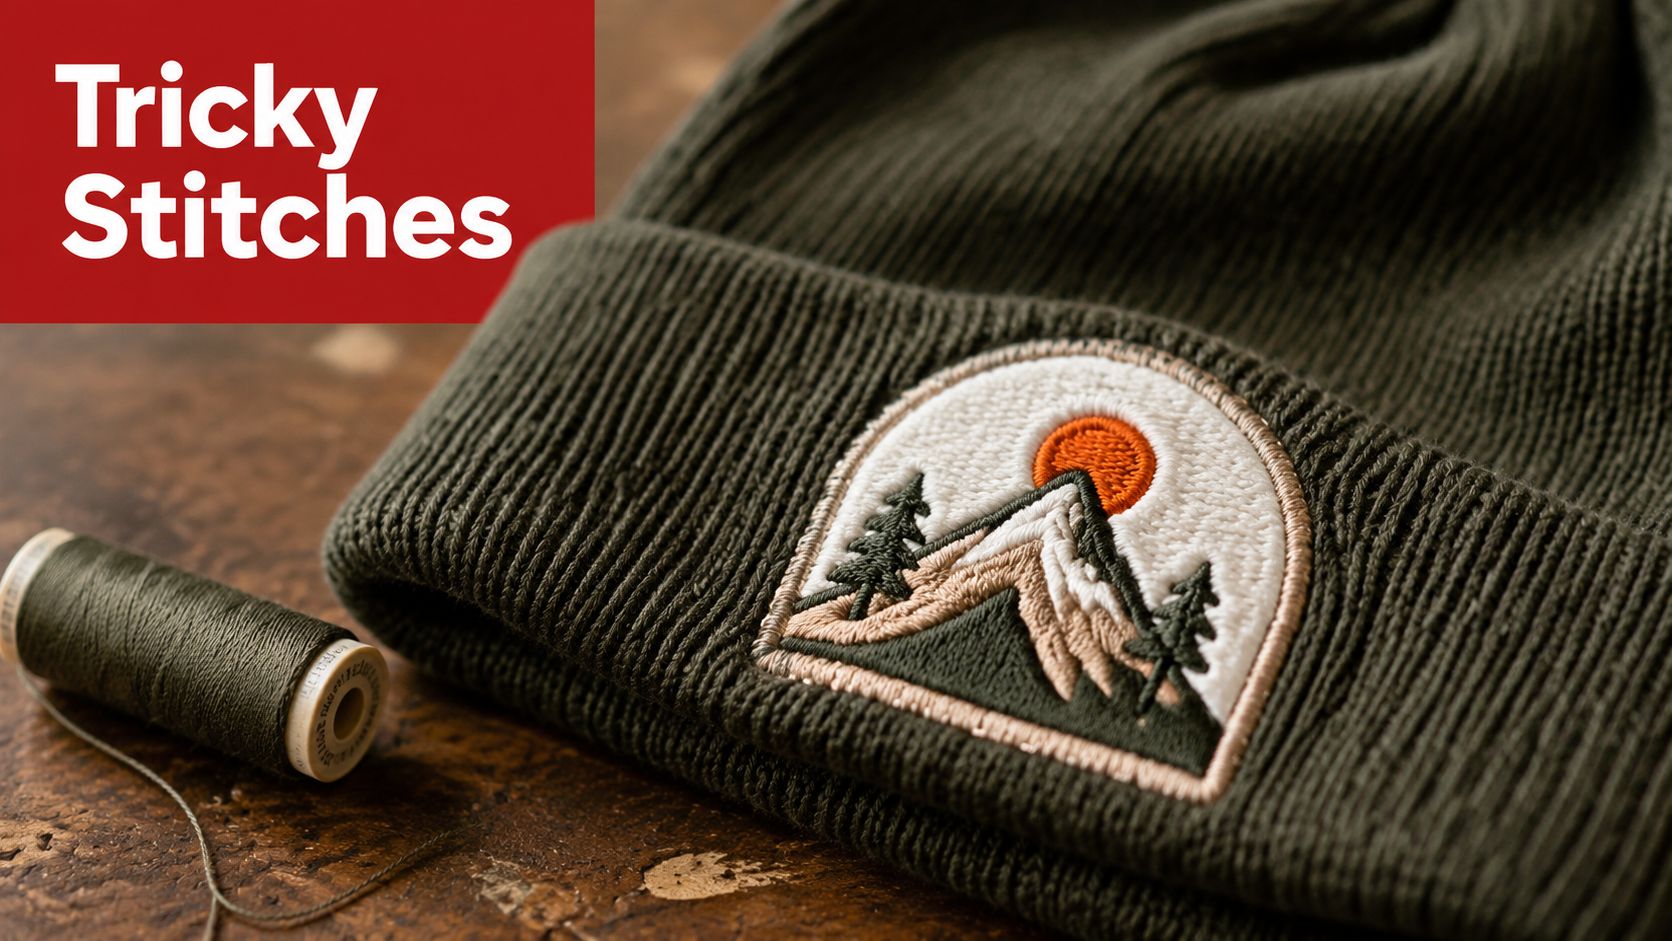
The fabric creates the problem
Beanies are close-fitting, brimless knit caps with a long documented history. One account traces knit cap-style headwear to 15th-century Britain and identifies Monmouth, Wales, as a place associated with early knitted wool caps. By the 20th century, the beanie had moved beyond utility into workwear, student culture, fashion, and counterculture use, as described in this history of beanies and their marketing potential.
That identity-rich surface is useful for branding, but it's physically small and flexible. Your logo needs to remain readable while the wearer pulls the beanie on, folds the cuff, and moves through daily wear.
Embroidery predates the beanie by a considerable margin. One industry history places embroidery as far back as about 30,000 years and notes that French inventor Josué Heilmann developed the first hand embroidery machine in 1832. That progression from handwork to mechanized stitching made commercial logo decoration possible, but knit hats still demand specialized handling because the material itself keeps moving, as explained in this history of beanie embroidery.
Practical rule: A beanie logo should be designed for the knit, not merely resized from an existing cap file.
Embroidery Styles That Work on Beanies
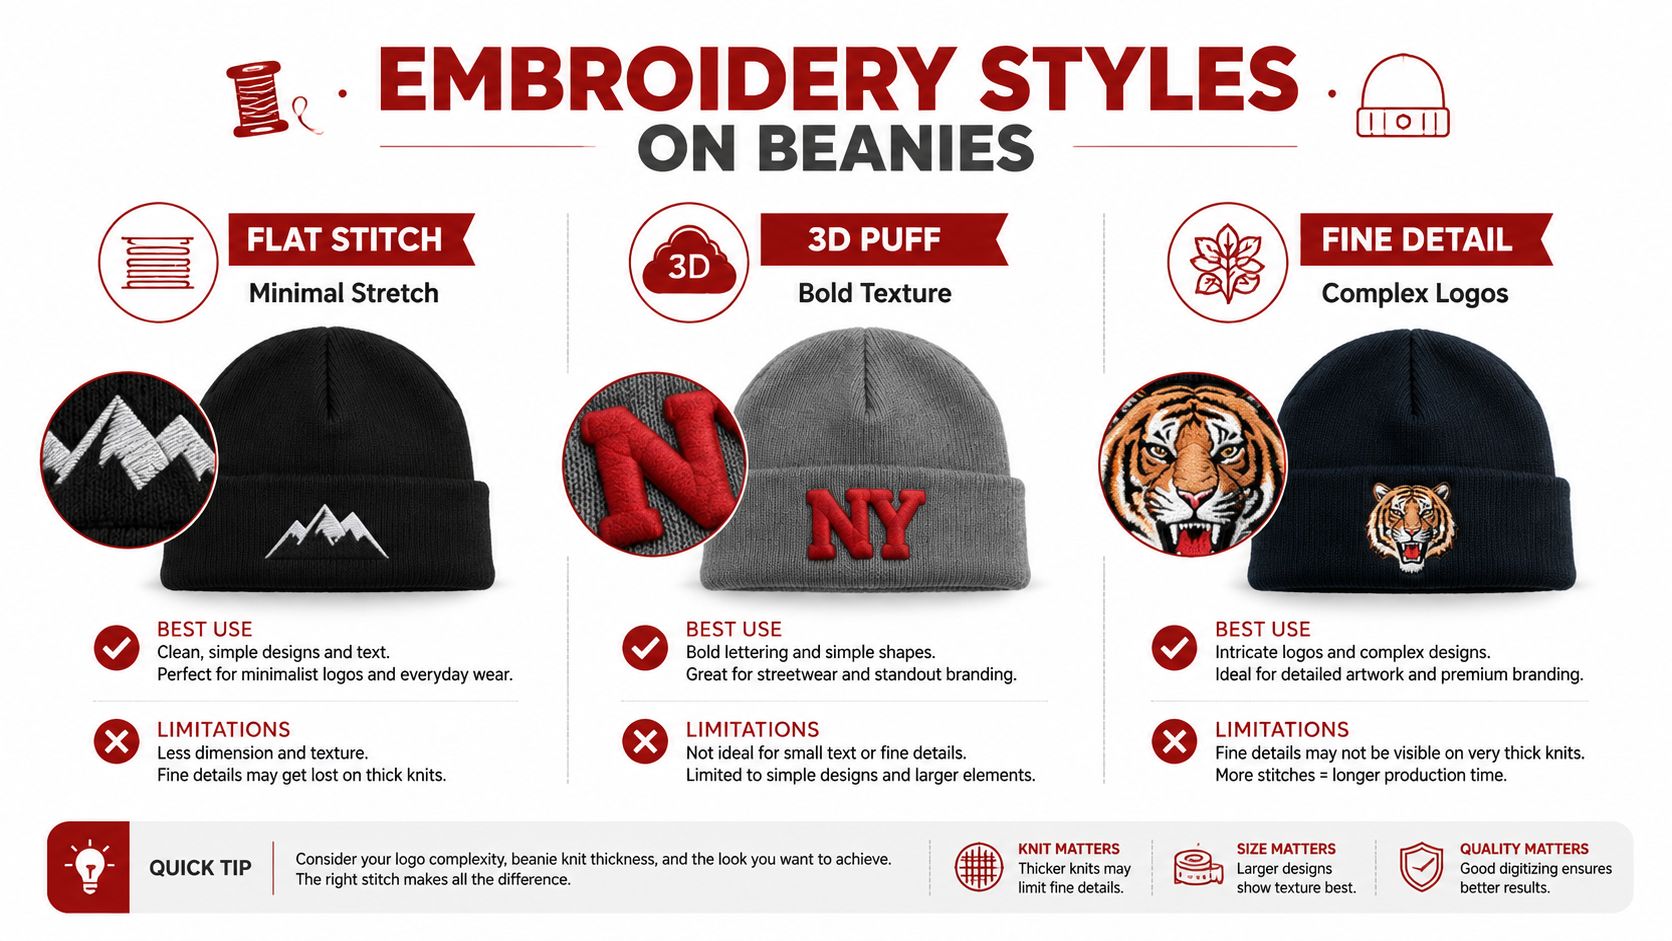
Choose the stitch style after considering the fabric, logo shape, and intended wear. A clean mockup can make every method look viable, but knit texture exposes weak choices quickly. For most brands, flat embroidery is the safest starting point.
Flat stitch
Flat stitch uses thread laid directly onto the beanie surface. It works well for bold initials, simple symbols, short names, and logos with clear solid shapes. Because the design sits closer to the fabric, it usually preserves comfort better than a bulky raised treatment.
Ask for flat stitch when:
- Your logo has broad shapes: Strong silhouettes remain easier to read against a textured knit.
- You want everyday wearability: The decoration stays relatively low profile.
- You're ordering a first production run: Flat embroidery gives the decorator more room to manage stretch and texture.
Flat stitch still needs careful density control. A heavy fill can stiffen the cuff and pull the knit out of shape, so “flat” doesn't mean “use the same file you use on a polo.”
3D puff
Puff embroidery adds foam beneath selected stitches to create a raised effect. It suits short, bold lettering and uncomplicated marks where the dimension is part of the brand style. It's a poor fit for tiny counters, narrow gaps, delicate outlines, and tightly packed artwork.
On a beanie, puff can become lumpy when the underlying knit shifts or when the design contains too many adjacent elements. Use it selectively, and insist on a sew-out on the actual blank before approving a full run.
Fine detail
Fine-detail embroidery is where many buyer expectations go wrong. Small lettering and narrow lines can look precise in a vector file but disappear into ribbing once stitches sink between the loops. Neutral beanie guidance recommends designs around 2 to 2.5 inches and warns against fine lines because knit texture can obscure them, as noted in this beanie embroidery guide.
A fine-detail logo can work on a smooth, tightly knitted blank with simplified digitizing. On a chunky ribbed beanie, reduce the detail or convert the design into a patch-like treatment. Don't approve a digital proof without seeing how the design sews.
Choosing the Right Beanie Style and Material
A logo that looks sharp on a product mockup can blur after sewing if the blank stretches, shifts, or buries stitches in its texture. Choose the beanie before approving the final file. Stabilization and digitizing can improve a difficult blank, but they cannot turn a loose, uneven knit into a smooth logo panel.
Match construction to the artwork
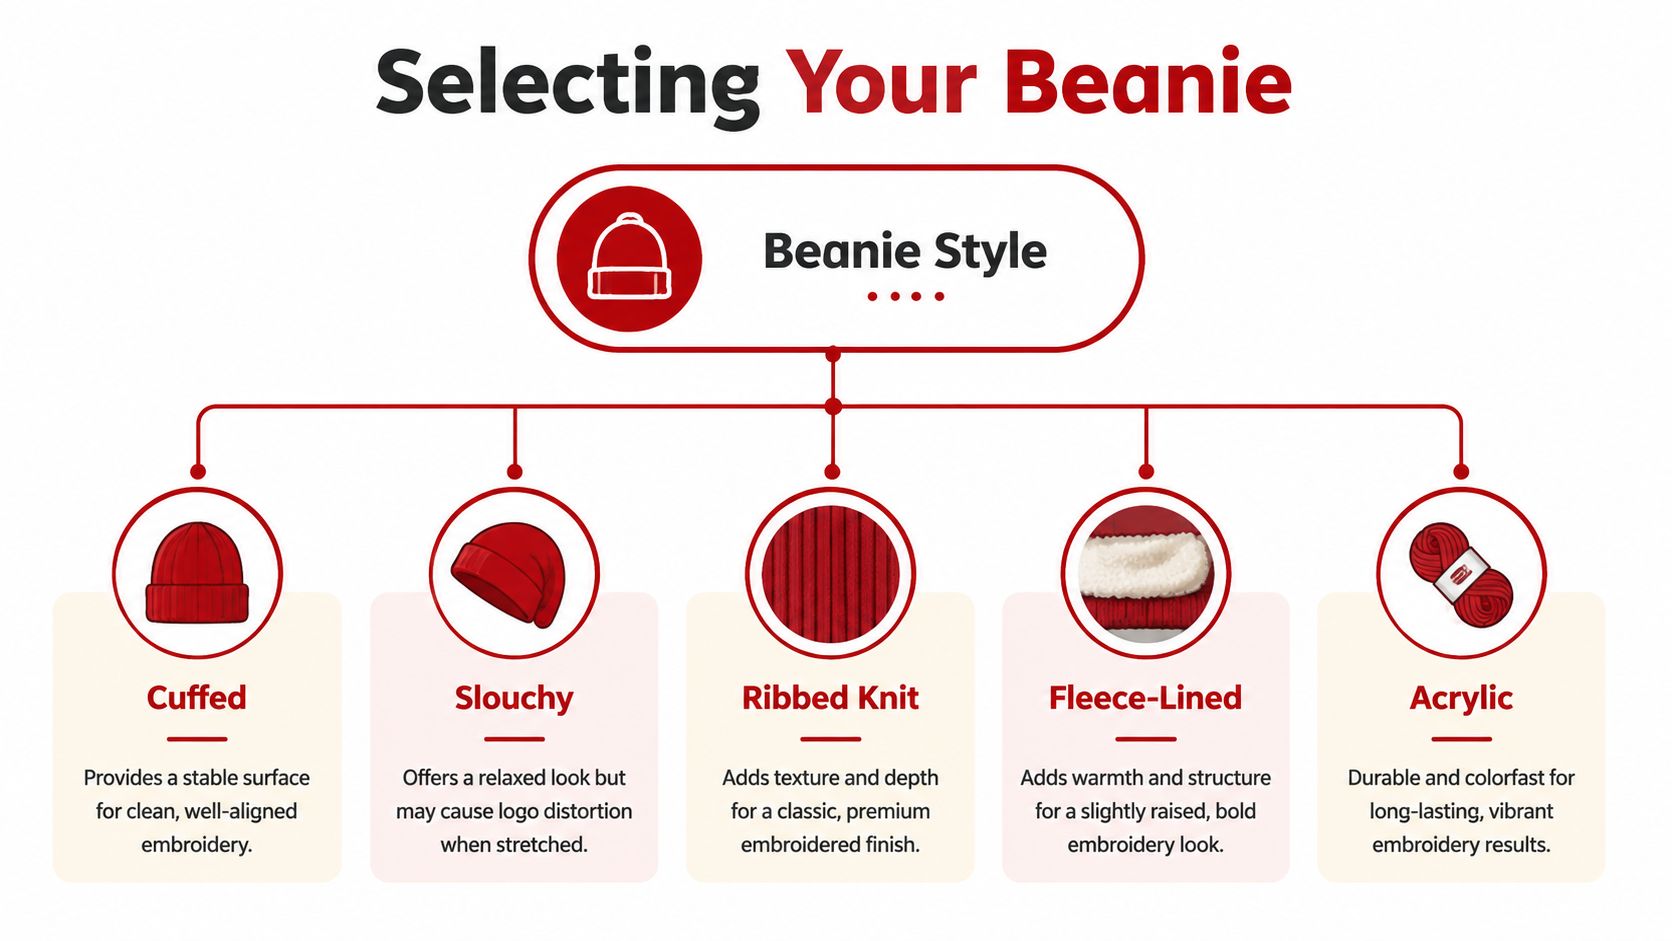
A cuffed beanie gives you a defined front area and makes branding placement easier to control. Choose it for company logos, team marks, and short text. The cuff creates a visual band that supports a compact design and limits how far the artwork can move.
A slouchy beanie has a more relaxed profile, but its front surface changes as the wearer folds or positions it. Use a simple mark that remains recognizable without exact placement. A detailed logo can lose its intended proportions when the fabric gathers.
Ribbed knit provides warmth and stretch, yet deep ribs can hide narrow lettering and thin outlines. Use wider strokes, open spacing, and strong contrast. Smooth knit usually gives detailed artwork a cleaner sewing surface because stitches do not disappear between pronounced ridges.
Fleece-lined styles feel comfortable and substantial, but the lining adds bulk inside the hat and can make hooping harder. Ask the decorator to confirm experience with that specific construction. Winter blanks do not all behave alike, and a sample sew-out can expose problems before a full order.
Consider the material's hand and brand position
Acrylic blends are common in promotional and team headwear because they are practical and easy to source. They suit accessible branding more than a luxury hand-feel. Wool blends support a more premium position, while their natural texture and surface variation call for simpler artwork and controlled stitch coverage.
Beanies moved from practical headwear into wider fashion and cultural expression, as outlined in this documented beanie history. Select a blank that matches the feeling customers should associate with the brand, not only the logo they need to see.
Shop the blank before finalizing decoration
Review wholesale beanie hats with the intended embroidery location in mind. Check the cuff's stability, the knit's evenness, and the usable area for the simplified logo. If tiny text must remain legible, change the blank or change the artwork. Forcing both choices together usually creates a costly reprint.
Design and Digitizing Rules for Knit Fabric
A logo can look sharp on a screen and fail on the production line. On a stretchy knit beanie, digitizing controls how much thread enters the fabric, how the surface holds its shape, and whether small details remain readable. A standard cap file usually carries excessive fill, tension, or detail for this flexible surface.
Reduce density before adding decoration
Start with low- to medium-density designs and strong stabilization. Dense fills and thick satin areas can stiffen the beanie and distort its knit structure. Lighter linear motifs preserve more flexibility, as explained in this technical guide to embroidering knit hats.
That guidance gives a practical target of roughly 2 mm stitch density for a foundation fill, with 4 mm stitch lengths and angled underlay layers. Give those figures to a qualified digitizer, then require a test sew-out on the actual blank. Knit structure, thread choice, and design shape still change the result.
Soften sharp transitions and avoid stacking heavy areas over one another. The file needs enough structure to hold its shape, while limiting thread coverage so the decoration does not fight the hat's stretch.
Simplify the artwork
Build the smallest useful version of the logo. Remove lines that will disappear in stitching, open tight counters, and give narrow characters more visual weight. For most beanies, keeping decoration around 2 to 2.5 inches is a practical boundary. Fine lines need particular scrutiny because they can sink into the knit, according to this beanie-specific embroidery guidance.
Use these approval questions:
- Can the mark be identified at a glance? Remove detail if it cannot.
- Are the letters broad enough for the knit texture? Thin type creates avoidable risk.
- Does the design rely on tiny negative spaces? They may close during stitching.
- Was the file digitized for knit fabric? Resizing a cap file does not solve the problem.
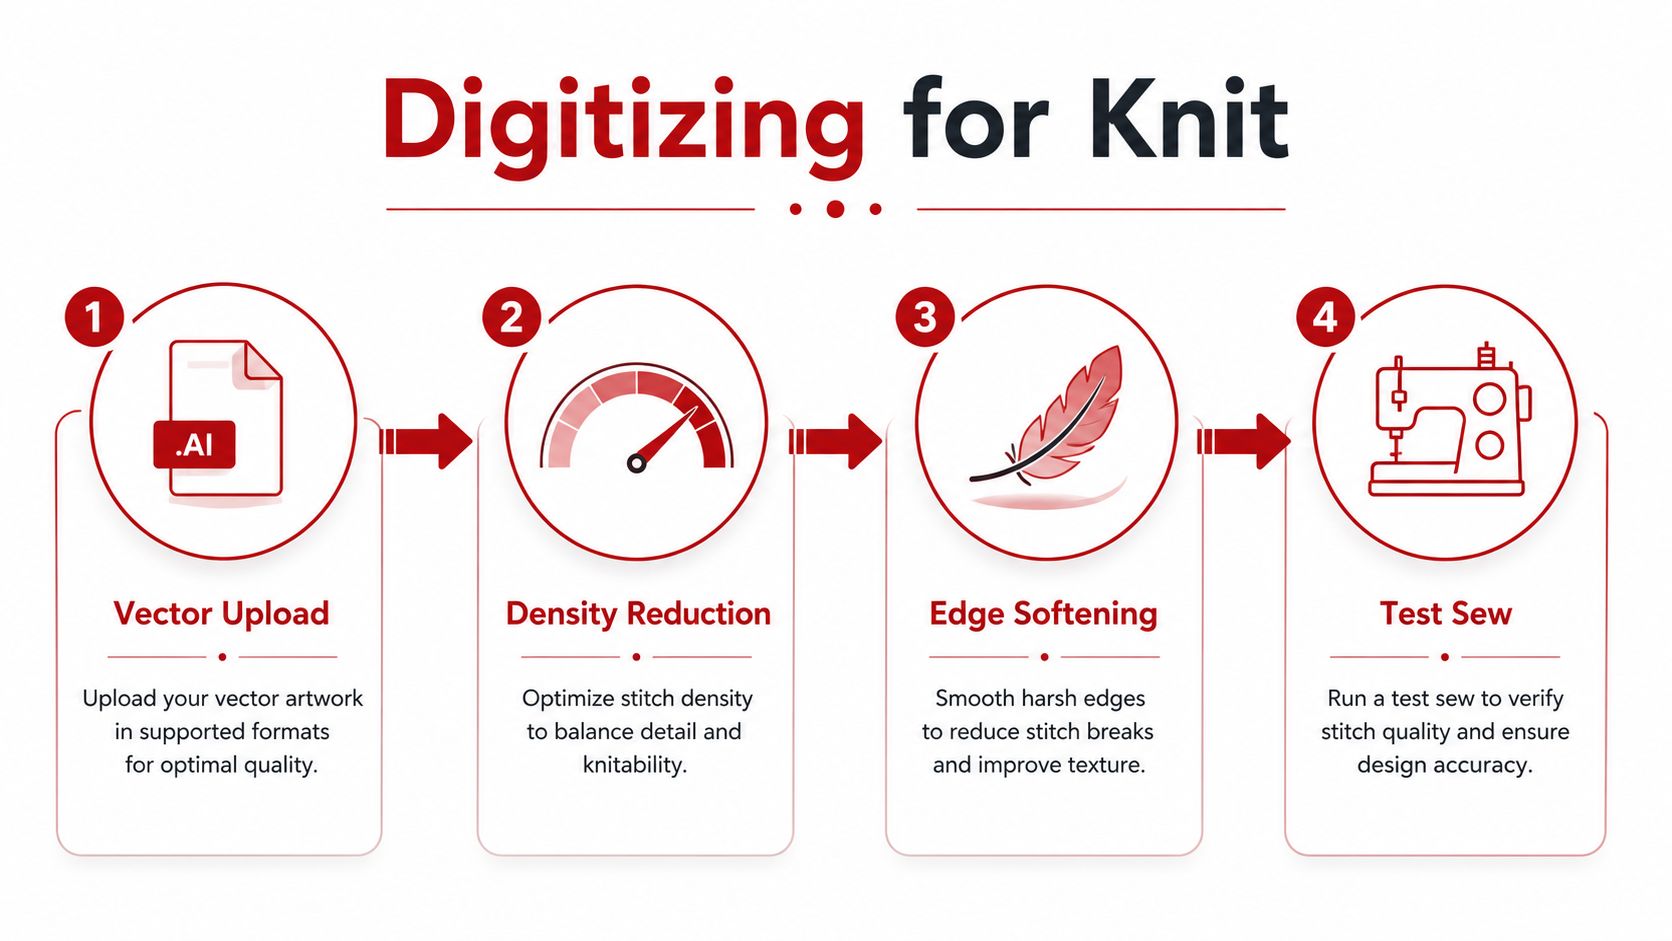
For file preparation, follow this guide to digitizing a logo for embroidery. Request a knit-specific file and a physical sew-out on the chosen beanie before approving the full run. That check catches blurry lettering, closed spaces, and excessive stiffness before they become reprint costs.
Thread, Needle, and Stabilizer Choices
A beanie can leave the machine looking fine and still fail after stretching over a head. The needle, topper, thread, and backing must suit the knit, or stitches sink, lettering blurs, and the fabric pulls out of shape. Ask your decorator to explain the setup clearly, including how the hat will be held without overstretching it.
For knit winter hats, use a size 11 / 75-11 embroidery needle, as recommended in this tutorial for embroidering knit winter hats. Place a water-soluble topper over the embroidery. It keeps stitches from dropping between uneven loops. Backing supports the knit during sewing and limits distortion.
Polyester thread is the practical default for winter headwear. It handles regular wear and washing while keeping color stable. Rayon gives a smoother finish, but reserve it for designs where appearance matters more than hard daily use. Metallic thread can snag on knit fibers. Test it on the actual beanie before approving production.
Backing choice controls how well the decoration holds its shape. A cut-away stabilizer usually gives stretchy knit a stronger foundation because it stays inside the hat. Tear-away can work on a stable, lighter knit, but it is a poor default for highly stretchy blanks. Fabric weight, ribbing, lining, and stitch density should guide the final setup.
Stabilizer and needle quick reference
| Beanie Fabric Type | Needle Size | Topper | Backing Type |
|---|---|---|---|
| Smooth, lightweight knit | 11 / 75-11 | Water-soluble | Light cut-away |
| Ribbed knit | 11 / 75-11 | Water-soluble | Cut-away with firm support |
| Thick textured knit | 11 / 75-11 | Water-soluble | Stable cut-away |
| Fleece-lined knit | 11 / 75-11 | Water-soluble | Cut-away selected for bulk |
Before production, confirm that the beanie will stay flat, the stabilizer extends beyond the hoop, and the operator has a method to control stretch during hooping. Also ask for a sew-out on the chosen blank. Compare thread fibers and color options in this embroidery thread guide before approving the final combination. A physical test exposes sinking stitches and excess stiffness that a digital mockup cannot show.
Production Workflow, Lead Times, and Pricing
A reliable beanie order follows a sequence. Artwork review comes first, followed by knit-specific digitizing, blank confirmation, sample sewing, approval, production, trimming, inspection, and packing. Delays usually appear when a buyer changes the logo after digitizing or approves a digital proof without checking a physical sew-out.
Pricing reflects more than the blank hat. Stitch count, number of thread colors, design complexity, decoration method, quantity, and sampling requirements all affect the quote. A simple tonal mark may be efficient to produce, while a multicolor design with heavy fills or raised elements demands more setup and closer quality control.
Build the schedule around decisions
Give the decorator final artwork before requesting a firm production schedule. Confirm whether the shop has the chosen blank in stock, whether the sample uses the same color and construction, and whether approval happens by photo or physical sample. Seasonal demand can make winter headwear harder to schedule, so leave room for artwork corrections and replacement pieces.
A sensible workflow looks like this:
- Artwork review: The shop identifies detail, sizing, and color concerns.
- Digitizing: A specialist adapts the logo for the knit surface.
- Test sew: The design is tested on the selected beanie.
- Approval: You review readability, placement, hand-feel, and thread color.
- Production: The approved file and blank move into the full run.
- Inspection: Staff check alignment, loose threads, puckering, and visible defects.
Ordering advice: If the sample isn't sewn on the actual beanie blank, treat the approval as incomplete.
Embroidery often beats a printed label when you want a tactile, durable brand mark. A patch can create stronger separation from the knit and may handle artwork that embroidery can't, while a jacquard-knit logo integrates the design into the hat itself. Current trend coverage points to tonal embroidery, 3D puff, and patch-like finishes as active decoration choices, while beanies increasingly function as year-round fashion pieces, according to this coverage of winter beanie decoration trends.
If you're comparing heat-applied decoration with sewn branding, review these hat pressing techniques before choosing a method. The right answer depends on the blank, artwork, expected wear, and the hand-feel your customer will accept.
Real Use Cases for Teams, Brands, and Events
A startup preparing for a trade show should keep the mark simple. Choose a cuffed beanie, use flat embroidery, and place a bold symbol or short company name where it remains visible when the cuff is folded. The priority is fast recognition and comfortable wear, not squeezing the full brand system onto a small knit surface.
A youth sports team has different requirements. Players and families will pull the hats on and off repeatedly, so durability and comfort matter more than intricate artwork. A stable cuff, strong contrast, a simplified team mark, and a sew-out that checks the lettering are better decisions than a detailed mascot illustration with tiny outlines.
Match the decoration to the product story
An apparel brand launching a seasonal drop can take more creative risks, but the blank still sets limits. Tonal flat embroidery can create a restrained streetwear look, while selective puff can give a compact wordmark more presence. Don't apply puff across a detailed illustration just because it looks impressive in a product render.
A nonprofit producing fundraiser headwear should protect its margin and its message. A one-color design on an accessible acrylic blank can keep the product approachable, while a patch may make sense if the artwork includes a scenic view, animal, or complex badge that would lose clarity in thread. The decoration should support the fundraising price and the intended audience rather than consume the budget.
Small run or replenishment program
For a small test run, approve one physical sample and use it to judge more than logo clarity. Check whether the beanie stays comfortable, whether the cuff still folds naturally, and whether the decoration looks centered when worn. For a larger replenishment program, lock the blank style, thread colors, file version, and placement notes so future batches don't drift.
The common thread across these projects is disciplined simplification. Teams don't need the same beanie, but every buyer needs artwork that respects the knit.
Your Beanie Embroidery Ordering Checklist
Use this checklist before approving production. Stretchy knit exposes weak digitizing quickly, so confirm the file, blank, and sew-out before committing the full order.
- Prepare clean artwork: Send vector artwork, accurate brand colors, and a simplified version for small decoration.
- Choose the blank first: Confirm the cuff, knit texture, lining, stretch, and usable decoration area.
- Select the stitch method: Make flat embroidery the default. Reserve puff for bold, uncomplicated shapes.
- Set a realistic size: Keep a compact mark around 2 to 2.5 inches when the blank and logo require it. Smaller lettering can close up as the knit flexes.
- Request knit-specific digitizing: Confirm reduced stitch density, suitable underlay, and controls that limit fabric distortion.
- Confirm the setup: Ask about the 11 / 75-11 needle, water-soluble topper, and backing method. These choices affect registration, coverage, and cleanup.
- Approve a physical sew-out: Inspect the actual blank, thread coverage, edges, and lettering. A computer rendering cannot show how the knit stretches.
- Check placement while worn: A design can look centered on a table yet shift visually on a head.
- Confirm production details: Get quantity, blank availability, decoration method, approval steps, and schedule in writing.
- Plan replacements: Order extras for staff programs, team rosters, or retail launches.
Ask one final question before signing off: “What part of this logo is most likely to fail on this knit?” A candid decorator should identify the weak point directly.
Dirt Cheap Headwear supplies wholesale beanies and custom in-house embroidery for brands, teams, businesses, and events, with low minimums starting at six pieces per logo. Visit Dirt Cheap Headwear to compare blanks, request a proof, and build the order around stretchy knit's actual limits.